Make experiments in extraction projects
Introduction
With an experiment, you submit the documents of a library to a model to obtain predictions; if library documents were previously annotated with expected results, Platform also determines how accurate the predictions are.
An experiment can be done with an existing model—trained or imported—or the initial phase of the experiment can consist of training a new model which is then used to analyze documents from the test library.
Experiments can be launched at different points in the interface:
- The main toolbar
- The model management dashboard
- The detail view of a library already used to train models
Below is illustrated the launch from the main toolbar or from the model management view when no models are defined, which is the one that provides more configuration possibilities.
Start the wizard
When launching an experiment, the default test library is the one currently selected in the main toolbar.
To start the experiment wizard:
- Select Start an experiment
 on the main toolbar.
Or, in the model management view, if no models are defined:
- Select Start an experiment at the center of the view.
Info
The ability to run the experiment depends on general settings.
If those settings impose a limit on the number of experiments and that limit has been reached, you will be asked for confirmation. If you decide to continue, the oldest experiment will be deleted.
If the limit has been exceeded, you will not be allowed to continue and you will be able to launch the experiment only after deleting enough experiments to reach or fall below the limit.
The dialog corresponding to the first step of wizard appears.
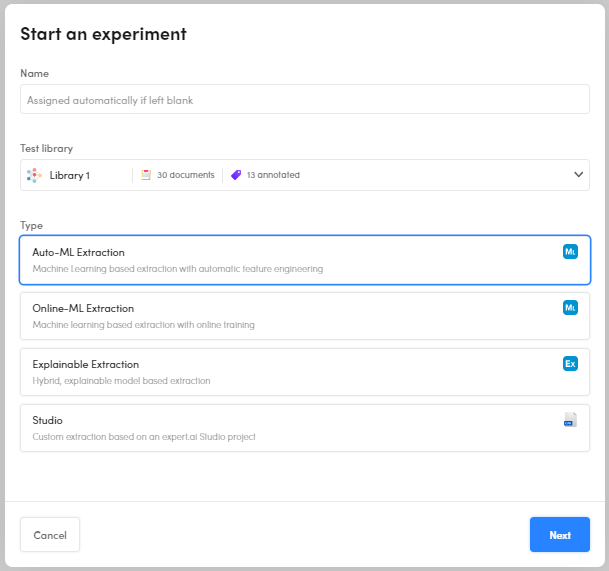
- Enter the name of the experiment or leave the field blank to let the system automatically assign a name.
- You can change the test library from the Test library dropdown menu.
- Set the matching strategy for computing metrics.
-
Check Consider only validated documents if you want the accuracy of the predictions to be measured only against library documents marked as validated.
Note
Do not confuse this option with the parameter allowing to train the new model based on validated documents only.
Use wizard features
During the wizard:
- Select Next to go to the next step.
- After the first step, select Back if you want to return to the previous step.
- Select Cancel or click anywhere outside the dialog to abandon the wizard.
The steps of the wizards are used to set all the parameters of the experiment before starting it. In the reference section of this manual you will find the description of all the parameters.
Advanced parameters can be hidden by selecting Hide advanced parameters. When the checkbox is selected, the steps of the wizard that deal exclusively with advanced parameters are skipped.
Select the engine
In the second step of the wizard you have to choose the engine for the model.
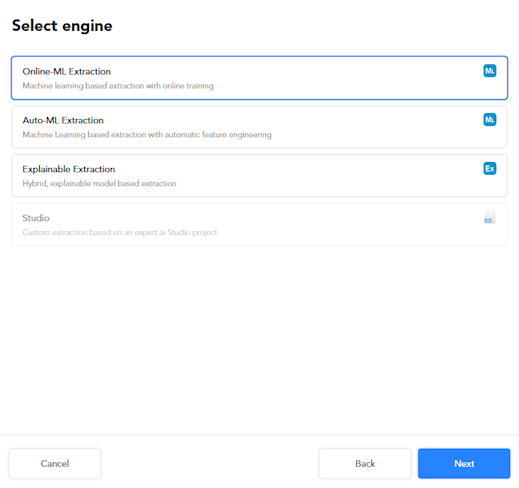
Some of the subsequent steps of the wizard are dependent on this choice as illustrated below.
Fast start
If the same combination of test library and engine has already been used in a previous experiment, the next step of the wizard allows you to quickly start the new experiment skipping the other steps.

In this step:
-
Select:
- Default settings to use default settings for the selected engine.
Or:
- Last experiment settings to use all the settings of the latest experiment of the same type.
-
Select:
- Fast start to skip all the wizard steps and jump to the Summary step.
Or:
- Edit settings to review and/or change the preset settings.
Online-ML Extraction wizard steps
Online-ML extraction experiments uses the online ML technique to train the model.
The training set is divided in smaller batches and a model is trained for every batch until the entire training set as been seen, then the process is repeated multiple times (epochs) to find the best model.
These are the steps of the wizard:
-
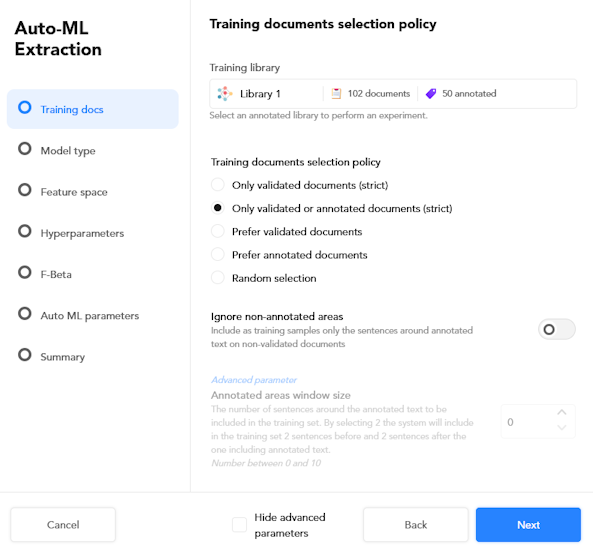
Training docs
This step determines the training library to use and which documents are taken from the library to train the model.
- Select the training library from the dropdown list.
- Choose the training documents selection policy.
- Optionally check and set the subsampling parameters
-
Model type
In this step you can select one or more ML model types. A distinct model will be generated for each type you choose.
When you choose multiple model types, all but the summary step of the wizard are skipped and Platform will use default values of the parameters to generate the models and perform the tests.
-
Feature space
This step allows setting the parameters that dictate which text features to use for training.
-
Hyperparameters
This step allows setting the hyperparameters of the ML model.
-
F-Beta
Use this step to set F-Beta optimization.
-
Summary
This step allows you to review your choices.
Select Start to start the experiment and watch its progress.
Auto-ML Extraction wizard steps
Auto-ML extraction experiments can use Platform auto ML feature to automatically choose the text features and the values for hyperparameters to use to train the model.
Unlike online ML, auto-ML experiments train the model in full-batch mode, passing through the training set all at once and only one time.
The steps of the wizard resemble those of the Online-ML extraction engine with the following differences:
- Model type: there are more, specific, ML model types to choose from.
- Feature space: when Automatic features selection is turned on, Platform automatically determines the text features to use with its auto ML capability.
- Hyperparameters: hyperparameters that are specific of the online ML technique are missing and when Activate Auto-ML on every parameter is turned on, Platform automatically determines the values of the hyperparameters with its auto ML capability.
- Auto ML parameters: this step is specific of this engine and allows setting the parameters of the auto ML capability.
Explainable Extraction wizard steps
Bootstrapped Studio Project experiments generate models that use human-readable symbolic rules to predict classes' instances.
Generated models can be exported and further managed as a project in Studio.
These are the steps of the wizard:
-
Training docs
This step determines the training library to use and which documents are taken from the library to train the model.
- Select the training library from the dropdown list.
- Choose the training documents selection policy.
-
Rules generation
This step allows setting the parameters that affect symbolic rules generation.
-
Feature options
This step allows setting the feature options.
-
Rules selection
This step allows setting the parameters that affect symbolic rules selection, which is a fine tuning of the rules.
-
Summary
This step allows you to review your choices and set the matching strategy.
You can also turn on Apply the model to the training library to perform a supplemental test of the model against the training library.
Select Start to launch the experiment and watch its progress.
Studio wizard steps
Studio experiments don't generate models, instead they use a previously imported CPK), that is a Studio-compatible explainable extraction model.
These are the steps of this wizard:
-
Model selection
Select the CPK from the list.
-
Structure
Manage graphical layout information than can be present in test document and documents with incompatible or unmanaged sections.
-
Summary
In this step you can review the features of the model and the library on which the experiment is performed.
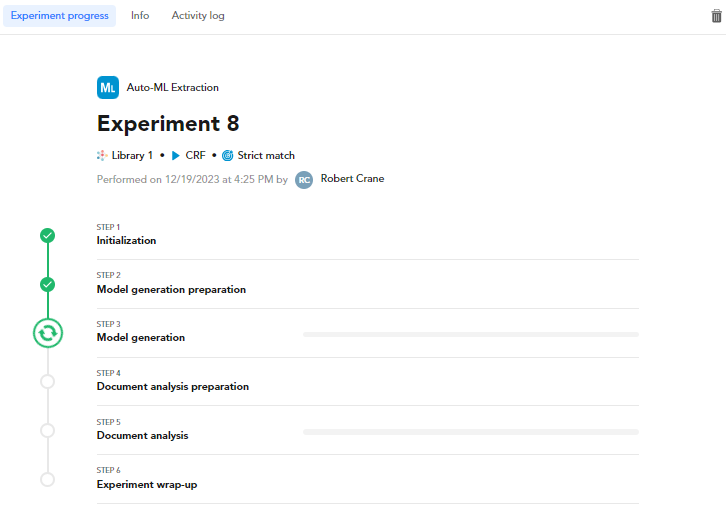
Experiment progress
When you complete the wizard by selecting Start in the Summary step of the wizard or Fast start in the homonymous step, the experiment starts and the progress of the process is displayed.
To cancel the experiment select Delete  .
.
Further information about the experiment is displayed in the Info and in the Activity log tabs.
In the end, experiment analytics are displayed in the Statistics panel of the Experiments tab. There you can analyze and interpret the results. Experiment results are associated with the test libraries you choose in the experiment wizard, the Experiments tab is disabled for other libraries.
Experiments run in the background, you can do something else with the application or even close it of log off and nevertheless the experiment will proceed.
To go back to the progress detail:
- Select the experiment task from the Background tasks list of the main toolbar.
- If it is the latest experiment, select Experiment progress under LAST EXPERIMENT from the Experiments dropdown menu on the main toolbar.
- Select Dashboard from the Experiments dropdown menu on the main toolbar, then select the experiment from the list on the left panel.