Tech versions
Introduction
The Tech versions tab of the administration dashboard allows users belonging to the Owner role to manage and create tech versions.

Browse tech versions
Tech versions are listed under the Tech version panel and described in greater detail in the central-right panel. This information is reported for every tech version:
- Tech version icon
- Name
- Creation date
- Last edit date
- Optional description
- A yellow star for the tech version marked as favorite.
- The number of associated projects and corpora
-
An icon indicating the status of the tech version:
Icon Status Description 
Active NL core instances are either ready to run or running. 
Offline NL core instances are offline, but the tech version can be activated 
Incomplete The tech version is missing one or more CPKs corresponding to NL Core instances 
Error The tech version is in error -
Optional expiration
- The list of languages with the number of instances of NL Core for each language. For each language you can toggle more detail by selecting the expand
 and collapse
  icons.
To filter the list based on the name of the tech version, type some text in the search box and press Enter: only tech versions with matching names will be listed. Select the X icon  inside the search box to cancel the filter.
To filter the list based on the status of the tech version, make a choice in the drop down menu above the list. Possible choices are:
- All tech versions: no filter, this is the only choice that allows listing incomplete tech versions
- Running: active tech version which are also in use
- Active: all active tech versions
- Idle: tech versions that are either offline or in error
The central-right panel automatically scrolls to show the detail of the tech version selected in the Tech version panel.
Check computing slots
The pool of computing slots is represented in the Slot manager strip at the top of the window and in the pop-up that appears when you change the number of instances of NL Core for a language.

Above the strip are the number of free slots and the total number. The color of the strip subdivisions is that of the corresponding tech versions. Gray subdivisions correspond to free slots.
The colored areas are divided into two thinner strips:
- A: allocated slots
- B: languages of NL Core instances hosted in the slots
If you hover over a language, a pop-up appears reporting the version of the technology and the name of the CPK.
Slot boxes have a darker hue when some analysis—upload of documents in corpora and libraries, experiments—is being performed by the corresponding instance of NL Core.

To know the status of an NL Core instance, hover over its slot: if the service is busy, a Active tooltip will appear, otherwise the tooltip will be Inactive slot.
After a certain time of inactivity of the NL Core instance, the original color of the box is restored.
Create a tech version
To create a tech version:
- Select Create tech version at the top of the Tech version panel. The Create tech version dialog appears.
- Type a name, select an identifying color and add an optional description.
- Select Create.
The new tech version is added to the list and automatically selected. Its details look like the screenshot below.
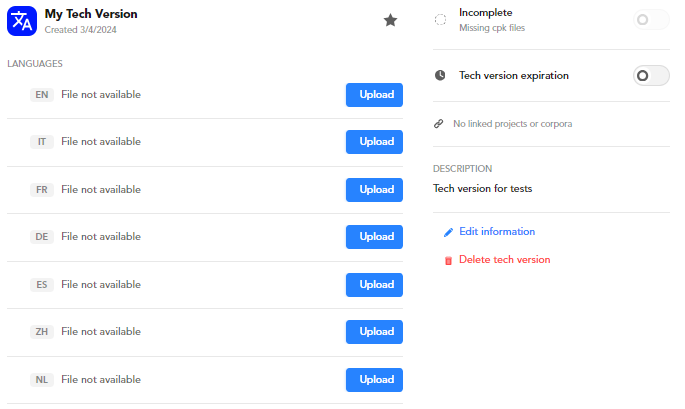
The initial status of a new tech version is incomplete because it lacks the NL Core packages (CPKs) corresponding to the NL Core instance for the languages it must support, languages that are defined when the Platform is installed.
All the required CPKs must be uploaded before the tech version can be activated and the NL Core instances spun up.
While the tech version is incomplete, any uploaded CPK can be replaced.
Upload a CPK
Uploading CPKs—that is the files of the NL Core instances—for all the languages of a new tech version is required to complete it so to activate it when needed.
To upload the CPK for a language:
- Select the tech version from the list in the Tech version panel.
- In the LANGUAGES area of the central-right panel select Upload on the right of the language row. The Upload CPK dialog appears.
- Select Browse files and locate the CPK file.
- Select Upload CPK.
Immediately after the upload of all the required CPKs, the status of the tech version goes from incomplete to offline , which means that it's ready to be activated.

While the tech version is offline, it's CPKs can be replaced.
Replace a CPK
Replace the CPK of a language of an incomplete or offline tech version when you need to update the NL Core instance files for that language.
To replace a CPK for a language:
- Select the tech version from the list in the Tech version panel.
- In the LANGUAGES area of the central-right panel select Replace on the right of the language row. The Upload CPK dialog appears.
- Select Browse files and locate the CPK file.
- Select Upload CPK.
Activate a tech version
To activate a tech version:
- Select the offline Tech version you want to activate from the list in the Tech versions panel.
-
In the central-right panel select the toggle button beside Offline.
The Activate tech version dialog appears.
-
In the LANGUAGES area, if necessary, select the plus and minus icons to set the appropriate number of instances of NL Core for each language. Above the LANGUAGES area, a strip that can be scrolled horizontally shows free and allocated computing slots.
- Select Activate.
The tech version will change its status from offline to active .

When a tech version becomes active:
- It is not possible to replace its CPKs.
- The tech version is moved to the top of the list in the Tech version panel.
Change the number of NL Core instances for a language
Having more than one instance of NL Core for a given language reduces analysis time during upload and experiments, because the documents to be analyzed can be divided between the multiple instances and processed in parallel.
Increasing the number of instances of NL Core for a given service implies allocating additional computing slots to the tech version, so the operation is possible only if there are free slots. By decreasing the number of instances for a language, on the contrary, computing slots are freed up for the instances of NL Core for other languages of the same tech version or for NL Core services of another tech version.
To change the number of instances of NL Core for a language of an active tech version:
- Select the tech version from the list in the Tech version panel.
- Select the plus or the minus icon on the right of any language row. The Edit slots assignment dialog appears.
- In the LANGUAGES area, if necessary, select the plus and minus icons to adjust the number of instances of NL Core for each language. Above the LANGUAGES area, a strip that can be scrolled horizontally shows free and allocated computing slots.
- When done, select Save.
Put a tech version offline
Putting an active tech version offline makes it unavailable for associated projects and corpora and frees computing slots for other tech versions.
An offline tech version can be re-activated later, when needed.
To put an active tech version offline:
- Select the active tech version you want to put offline from the list in the Tech versions panel.
- In the central-right panel select the toggle button beside Active.
When a tech version goes offline:
- It is possible to replace its CPKs.
- The tech version is moved below the active tech versions in the list inside the Tech version panel.
Note
If you don't need a tech version anymore, you can delete it.
Mark a tech version as favorite
The favorite tech version, when active, is the default choice when creating new projects or corpora.
To make a tech version the favorite:
- Select the tech version from the list in the Tech versions panel.
- In the central-right panel toggle the star icon until it becomes yellow.
Set an expiration date
You can set an expiration date for a tech version. That works like a memorandum: on expiration, the status of the tech version is not changed, it is up to the users to decide what to do with the Tech version, for example whether to delete it.
To set an expiration date for a tech version:
- Select the tech version from the list in the Tech version panel.
-
Turn on Tech version expiration in the detail panel.

-
Below EXPIRATION DATE, type the expiration date or select it from the drop down calendar.
Edit tech version properties
To change the icon color, the name or the description of a tech version:
- Select the tech version from the list in the Tech version panel.
- Select Edit information in the detail panel. The Edit information dialog appears.
- Check and change the properties then select Save.
Delete a tech version
Delete tech version that are not needed anymore.
To delete a tech version:
-
If it's active:
- Put it offline.
- Select Delete tech version in the detail panel.
-
If offline:
- Select the tech version from the list in the Tech version panel.
- Select Delete tech version in the detail panel.