The list view and its variants
Overview
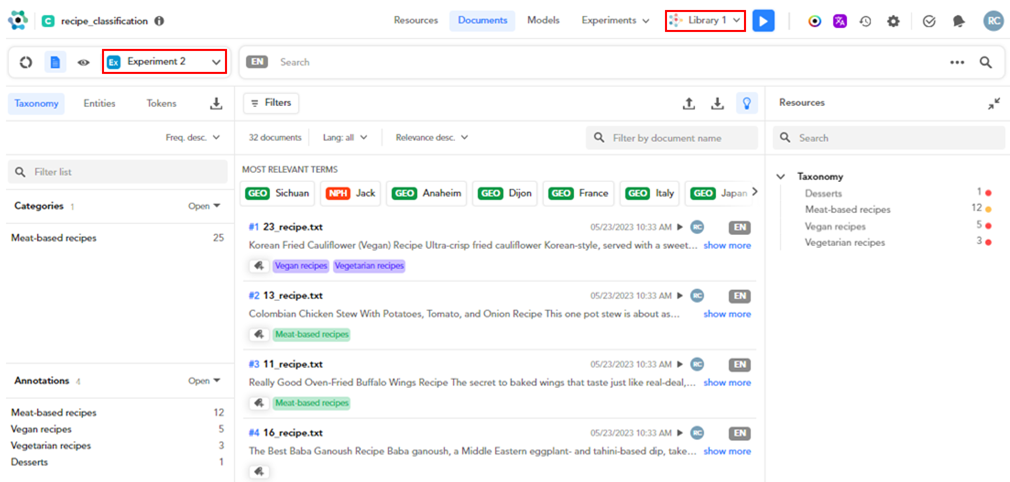
The list view is the default when you select the Documents tab in the dashboard toolbar.
It shows the documents of the current library—the one selected on the toolbar—and can display experiment output data for that library. The name of the experiment, if one was selected, is displayed above the left panel.
Directly under the dashboard toolbar there is a strip with two bars: the toolbar to switch to other views (detail  and analytics
  ), with the name of any selected experiment, and the search bar.
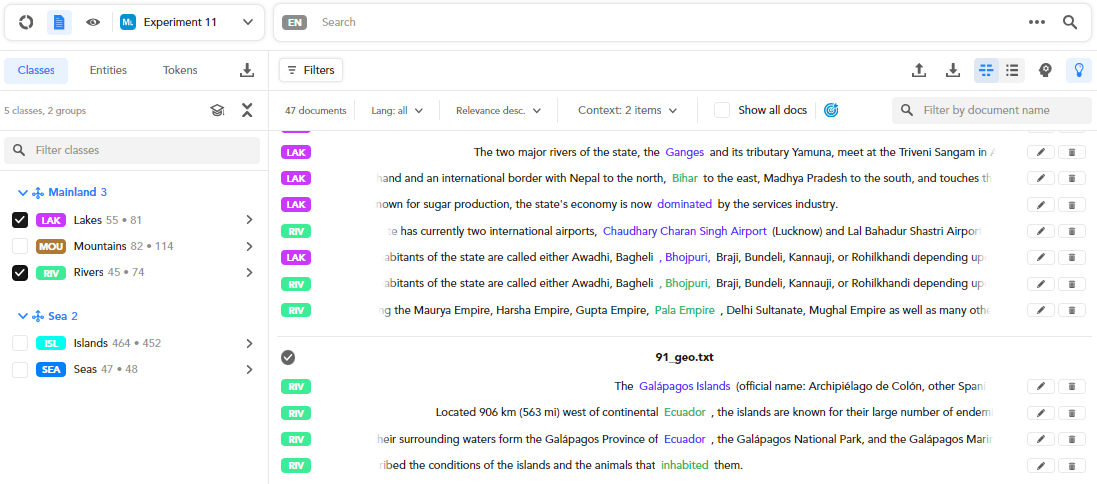
The main part of the view consists of two or three panels.
The left panel shows facets and allows you to drill down to interesting documents.
At the center of the view there is the list of documents, with its own toolbars.
In case of categorization projects, on the right there is the Resources panel.
Note
- In case an experiment has been performed, on the right of the analyzed documents there are performance date and time.
- In case a document has been annotated, the user icon who annotated it is visible. Hover over the user icon for further details.
Expand the latest experiment
Select the down arrow  and the up arrow
  to expand and collapse the experiment and check some details.
This is what you see in case of extraction, categorization and thesaurus experiments:
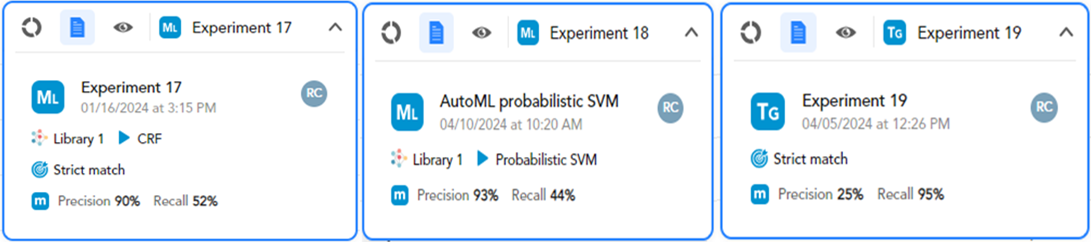
These details are:
- Experiment type
- Experiment name
- Performance date and time
- Experiment author
- Experiment precision and recall
- Test library (for categorization and extraction experiments)
- Matching strategy (for thesaurus and extraction projects)
-
ML model type (for extraction and categorization projects)
Note
The ML model type is available only if your experiment type is a Machine Learning.
-
Metrics policies
This is what you see in case of extraction and categorization experiment CPKs:
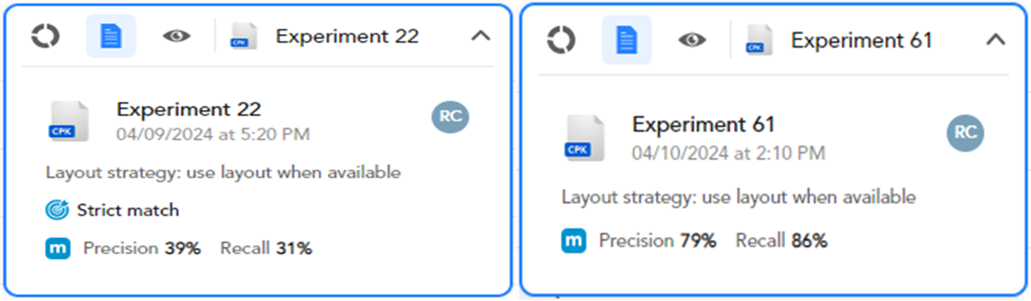
- Experiment name
- Performance date and time
- Experiment author
- Experiment precision and recall
- Matching strategy (for extraction projects)
- Layout information
Sort the document list
To sort the document list by relevance or by file name, in ascending or descending order, choose the corresponding option from the dropdown menu on top of the document list.
Other sorting options may be available depending on the project type.
In all project types that allow annotations (categorization, extraction, thesaurus), there is the Annotation option to sort by number of annotations.
In the context of an experiment, which is possible in all types of projects except corpus, the Relevance option, to sort on the score, and the Last analysis option, to sort on the date of last analysis of the documents, are available.
Further sorting options specific to a project type are described together with the peculiarities of the Documents tab, in the manual section dedicated to project type.
Search and filter
There are many ways to find the documents you are looking for:
- Read the article about the search bar to learn how to use it to search documents.
- Read about the presence-absence filter to learn about another way to filter the list of documents.
- Use facets (see below) to drill-down the list of documents.
- To filter documents by name, type at least three characters in the Filter by document name box above the list, then press
Enter. Only documents with names matching what you typed will be listed. The match is case sensitive.
Select the X icon to cancel the filter.
Most relevant terms
Above the document list, the MOST RELEVANT TERMS strips list the terms that were deemed as specially representative of the document during the analysis of the text.
To toggle the display of the list, select Disable most relevant terms suggestion  or Enable most relevant terms suggestion
  on the toolbar below the search bar.
To add a term to the search criteria and immediately trigger a search, double-click the term.
Facets
Facets are information about documents that are interesting to know in themselves and can be used as filters to perform faceted search, a way of drilling down the list of documents until leaving only those with certain characteristics.
Among the facets there are always the text features extracted by the Natural Language Understanding (NLU) analysis that is part of the upload procedure.
In the context of an experiment, facets also include the results of the experiment itself (categories in categorization projects, classes's values in extraction projects and detected concepts in thesaurus projects).
If there are any annotations of expected results, those are also listed as facets.
Entities and tokens
All documents go through a Natural Language Understanding (NLU) analysis during upload to recognize named entities and get semantic, lexical and keyword information about text tokens, so, whichever the project type, this information is available in the Entities and Tokens tabs of the left panel.
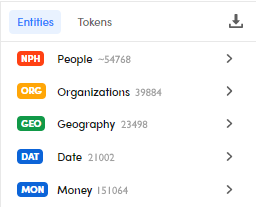
In the Entities tab you find an item for each named entities type or group of types. For example, Geography and Organizations are groups of types: the former includes buildings and environments, the latter companies and mass media.
Entity types for which no occurrence was found in the document set are grayed out.

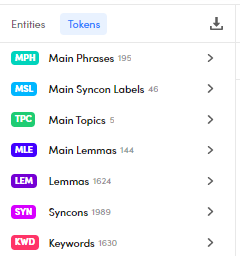
In the Tokens tab you will find all the other information obtained from the text tokens of the documents during the NLU analysis.
Next to each item, the number of occurrences in the current—possibly filtered—set of documents is displayed. In case of large values, this number can be approximated: approximate numbers are preceded by the tilde sign.
To expand the list of values for an item, select it or select Open  . Select Go Back
  beside the item name to collapse the list of values.
If the type represents a group of sub-types, like Organizations, multiple lists will be displayed.

If a sub-list appears truncated, select Open beside the type name to give the list maximum vertical space. Select Close to revert to previous visualization.
To add an item to the search criteria and immediately trigger a search, double-click the item.
To filter the list of values, type a value or the initial part of it in the Filter list box and press Enter. The match is case sensitive. Select the X icon inside the box to cancel the filter. In case of multiple lists—as for the entity type Organizations—, the total number of items will be displayed in parentheses next to the number of filtered items.
To change the sort order, select the desired option from the dropdown menu at the top right of the list.
For lemmas, main lemmas and syncons, if you want to look up the knowledge graph, hover over the item and choose Search lemma in knowledge graph or Search syncon in knowledge graph  . The list view of the knowledge graph navigator opens. In the case of a lemma, the lemma is used as a search criterion and all the syncons for all the concepts that can be expressed with that lemma are shown. In the case of a syncon, the concept is punctually shown.
For syncons, if you want more information, hover over the item and select Show information  . A pop-up appears showing the part of speech, the language, any gloss and the list of terms used to express the concept. To make the poop-up disappear, just click outside it.
Other tabs
While the Entities and Tokens tabs are common to all project types except for knowledge graph customization projects, there are some tabs that are unique based on the project type:
- Taxonomy for categorization projects
- Classes for extraction projects
- Thesaurus for thesaurus projects
Context view
The context view displays a list of textual contexts, each one focused on an annotation or an extraction. This view is available for extraction and thesaurus projects.
Note
The context view is activated only if there are annotations and in strict match strategy (in Extraction projects).
In context view it is possible to annotate. See Annotate in context view for extraction projects or Annotate in context view for thesaurus projects.
Switch from list view to context view
-
To switch to the context view:
- Select Show context view
 on the toolbar at the top of the document list.
Or:
-
Select:
- The Classes tab, if in an extraction project.
Or:
- The Thesaurus tab, if in a thesaurus project.
-
Hover over:
- The class of interest, if in an extraction project.
Or:
- The concept of interest, if in a thesaurus project.
-
Select Context view
.
Or, to directly apply the context view to a specific class value in an extraction project:
-
Select:
- The Classes tab, if in an extraction project.
Or:
- The Thesaurus tab, if in a thesaurus project.
-
Select the chevron icon
 to expand the class of interest.
 - Hover over a value below Extractions or Annotations and select Context view .
- Select Show context view
-
To switch to the list view, select Show documents view
 .
. -
To switch to the detail view:
- Select View document
 .
.
Or:
- Select the document name in the central panel.
- Select View document
Populate the list
To populate the list:
-
Select:
- The Classes tab in the left panel if in an extraction project.
Or:
- The Thesaurus tab in the left panel if in a thesaurus project.
-
Expand the class of interest if in extraction project.
- Select the checkbox at the left of the values of interest.
Note
You can select either single class values or a whole class.
Depopulate the list
To depopulate the list:
- Deselect the classes or the concepts check-boxes, depending if in extraction or thesaurus projects.
Or:
-
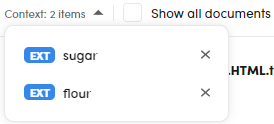
Deselect the classes or the concepts check-boxes, depending if in extraction or thesaurus projects, from the Context dropdown menu above the document list.
Open a document from context view
Opening a document from the the context view causes the switch to the detail view.
To open a document:
- Select the file name of a document in the list.
Or:
- Select at least one context in the document box in the list and then select View document at the top left of the document list.
Other operations
- Select Show all documents to show all documents.
- Use the dropdown menus to sort the documents by language and relevance.
Export facets
To export facets to a JSON file:
-
Select Export
 on the left panel toolbar. The Export facets dialog appears.
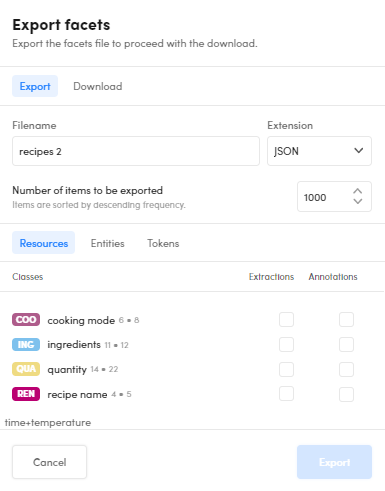
-
Inside the Export tab, in the upper part of the dialog:
- Type a filename or confirm the suggested one.
- Set the number of items to export
-
Inside the Resources tab, in the lower part of the dialog, select the definitions and/or the annotations of project resources to export.
- Inside the Entities and Tokens tab, in the lower part of the dialog, select the types of named entities and/or the types of token information to export.
-
Select Export. The focus goes to the Download tab in the upper part of the dialog.
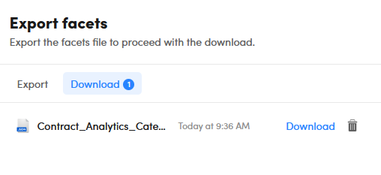
After the operation is completed, the number of downloadable exports inside the Download tab label is updated and the new download-ready export is listed below.
-
Select Download beside the export to download the file or Remove
 to delete the export.
Delete a document
To delete a document, select it from the list then select Delete document on the toolbar
Download documents
To download—export—documents, select Download documents  on the toolbar above the list of documents. The Export documents dialog appears: read the article about this dialog to learn how to use it.
Upload documents
To upload additional documents in the current library or corpus, select, select Upload documents  on the toolbar above the list of documents. The Upload documents dialog appears: read the article about the upload procedure to learn how to use it.
Switch to the detail view
To switch to the detail view:
- Double-click a document in the list.
Or:
- Select a document file name in the list.
Or:
- Select a document in the list and select View document .
Check project analytics
Select Analytics to switch to analytics view.
More information in the article dedicated to analytics for each project type that supports them: