Write code
You write rules and scripts using Studio programming languages.
Rules and scripts are to be written inside text files with specific extensions: rules files must have the .cr extension, script files must have the .jr extension.
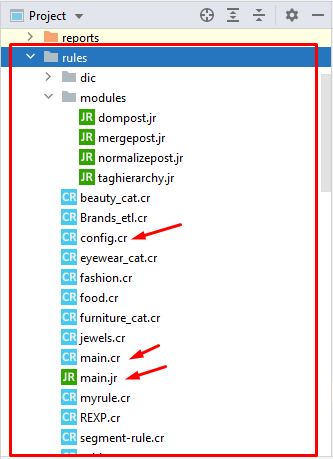
Both types of files are kept in the rules folder of the project structure.
Default code
Studio project modules initially contain the code of a sample text intelligence engine. Albeit minimal, this engine is already capable of categorization and extraction.
Three files are automatically created inside the rules folder:
config.cr: a rules file containing sample declarations of sections, segments and extraction templates.main.cr: a rules file containing anIMPORTstatement—it incorporates theconfig.crfile at runtime—and two simple rules, one for categorization and the other for extraction.main.jr: a script containing empty event handling functions.
The project also has a pre-defined sample taxonomy inside the taxonomy.xml file. The sample categorization rule in the main.cr file refers to a category defined in that taxonomy file.
Replace the default code with your own.
Main files
main.cr is the main rules file.
You must write all your rules inside it or have your rules split in several .cr files provided that you use the IMPORT statement to include those files in the main.cr file.
Inclusion can be recursive. For example, you can make main.jr include files a.cr and b.cr, then have a.cr include a-a.cr and so on.
Please refer to the IMPORT statement documentation.
config.cr is a convenient place to write project-wide definitions and options. In the event your project does not require these, the file can be removed.
main.jr is the main script file.
The default file already contains the definitions of the event handlers.
You can put your scripting code in that file or use other files, but, in that case, you must structure the code in those files as modules and use the require statement to use their code in main.jr.
For example:
var regexcleaner = require('modules/regexcleaner');
Note
The modules of a script are not to be confused with the modules of a project. The modules of a project are independent sub-projects, each of which corresponds to a text intelligence engine. The modules of a script are sub-programs that you can use in the script.
Sub-folders
If you decide to divide your rules and your scripts among multiple files, you can organize these files as you wish in sub-folders of the rules directory.
Find more information in the article about creating and managing files and folders.
Code writing tools
The following articles in this section of this manual illustrate the main tools available for writing rules and scripts.
You can write rules from scratch using the Rules language or you can start from rule templates.
Smart completion helps you write code faster and without errors.
Whenever you need to specify syncons or lemmas in your statements, you can use the Knowledge Graph and the Knowledge Graph Search tool windows.
If you want to check syncons and lemmas that are already in the code, use the knowledge graph lookup commands. You can also get quick information on a syncon indicated in the code.
IntelliJ IDEA, the platform on which Studio is based, provides powerful search-and-replace features.
Tip
Add comments to your code. The experience of many programmers teaches that the time spent commenting the code is largely saved when the program has to be maintained. Read the article about this topic to learn how to do it.
As you write code, these features can also help:
Code selection
Studio provides several useful ways to select code. Discover them in the article dedicated to this topic.
Add and delete lines
-
To add a line after the current one, press
Shift+Enter. -
To add a line before the current one, press
Ctrl+Alt+Enter. -
To duplicate a line, press
Ctrl+D. -
To delete a line, press
Ctrl+Y.
Auto-save
Studio automatically saves files as a consequence of these actions:
- Build
- Analysis & debug
- Version control operations
- Closing a file or a project
- Quitting the IDE
To change the auto-save behavior:
- Select File > Settings > Appearance and Behavior > System Settings.
- Review the auto-save settings in the Autosave area.
Info
To save all the changed files at once whenever you want:
- Select File > Save All on the main menu.
Or:
- Press
Ctrl+S.
Undo and redo changes
To undo changes:
- Press
Ctrl-Z
Or:
- Select Edit > Undo Action on the main menu.
To redo changes:
- Press
Ctrl-Shift-Z
Or:
- Select Edit > Redo Action on the main menu.
Note
Action is the action type to undo or redo.
For more sophisticated change management, you can use the local history (see below) or a VCS.
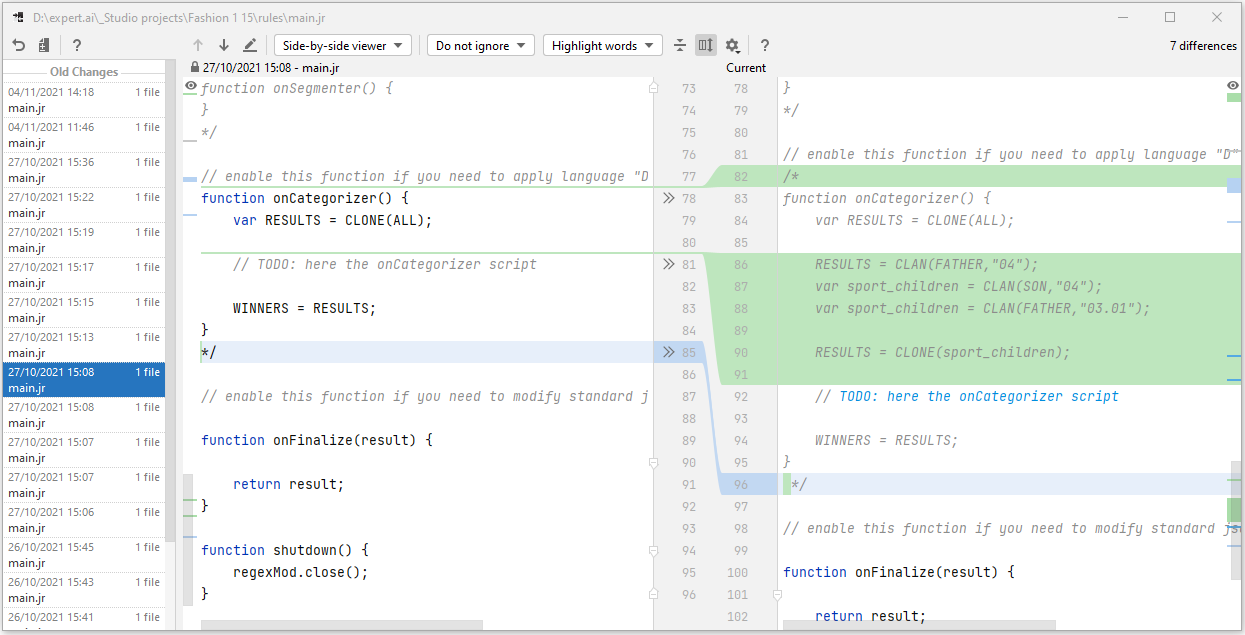
Local history
Local history keeps track of file changes happening on the local computer without requiring a VCS.
This allows seeing the chronology of the changes for rules files and script files. It also allows rolling back a file to any previous stage.
Caution
Local history is limited in terms of time and size. By default, it is configured to store changes for the last five working days.
For more information on the local history functionality and the ways to compare and restore versions, see the IntelliJ IDEA documentation.
View a file's local history
-
Open or select the file in the editor.
-
Select VCS > VCS Operations > Show History on the main menu.
Or:
Right-click inside the file tab or anywhere inside the file and choose Local History > Show History.
Or:
- In the Project tool window, right-click the file and choose Local History > Show History.
Selection history
It is possible to see the history of a part of a file.
- Open the file or select it in the editor.
- Select the part to inspect.
- Right-click the selection and choose Local History > Show History for Selection.