Use TODO items
Studio automatically creates a special kind of bookmark for the TODO items (read the page that explains how to insert reminders).
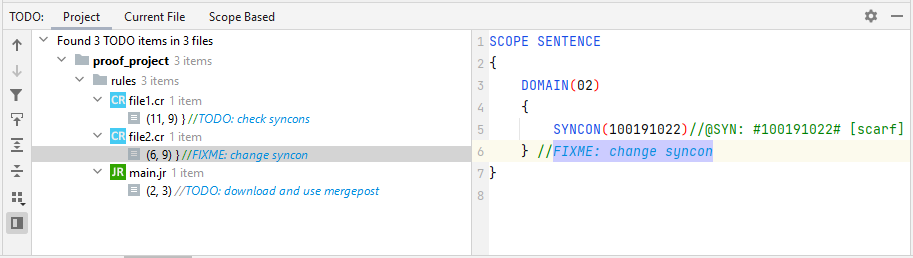
Display the items
To display TODO items, select the TODO tool window.
Navigate
To jump from a TODO item to the corresponding comment inside the source code:
- Double-click the item.
Or:
- Select Navigate with Single Click
 on the toolbar.
 - Select the item.
Or:
- Right-click the item and choose Jump to Source
Navigate through TODO items
To navigate through TODO items:
- Select Next TODO
 or press
 Ctrl-Alt-Down.
Or:
- Select Previous TODO
 or press
 Ctrl-Alt-Up.
Show preview panel
To show the preview panel containing the selected TODO items, select Preview Source  .
.
Expand and collapse files
-
To expand all files containing TODO items:
- Select Expand All
 .
.
Or:
- Right-click and select Expand All.
Or:
- Press
Ctrl-NumPad +.
- Select Expand All
-
To collapse all files containing TODO items:
- Select Collapse All
 .
.
Or:
- Right-click and select Collapse All.
Or:
- Press
Ctrl-NumPad -.
- Select Collapse All
Group TODO items
For a better view of your TODO items, select Group By  on the toolbar.
You can group your items by:
- Module to see the module where your items are.
- Packages to see the folders' path of your items.
- Flatten View to view the path of the folder containing your items.
Filter TODO items
To filter your TODO items, select Filter TODO Items  . Select:
- Show All (by default) to see them all.
Or:
- Edit Filters to filter your list.
If you select Edit Filters, the TODO dialog will appear.
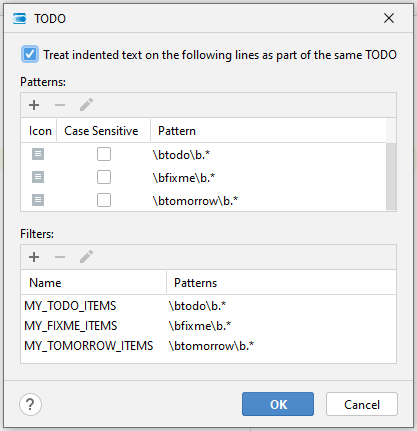
TODO dialog
The TODO dialog has two panels:
- Patterns, where you can create, edit and delete new and old TODO items.
- Filters, where you can filter your TODO items by associating them with a name you want.
Note
Each time you create, edit, delete and rename items, always select OK in the TODO dialog to save changes.
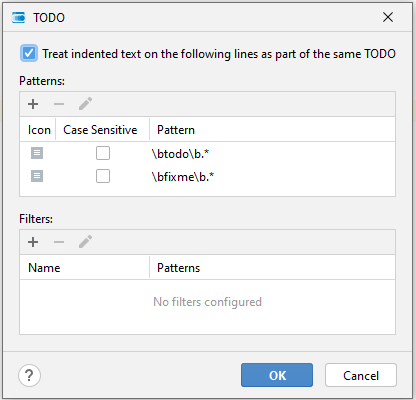
Patterns
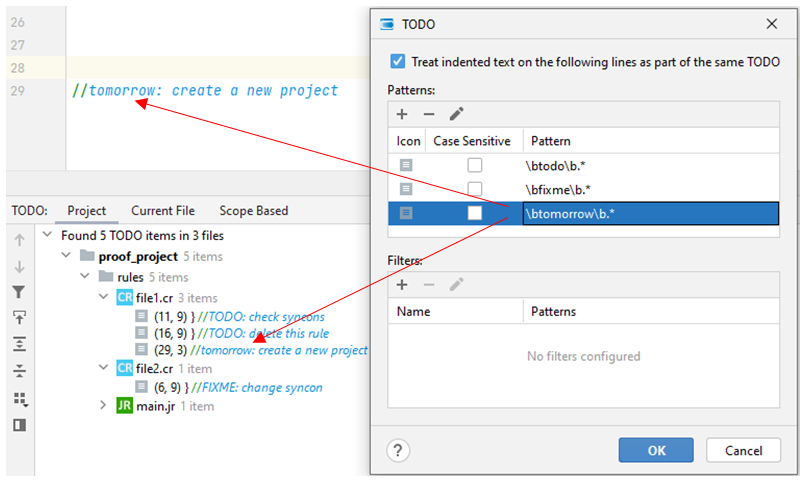
To create a new pattern:
- Select Add
 .
. - In the Add Pattern dialog, write a pattern in Pattern and select an icon in Icon.
- Optionally check Case sensitive to make your TODO item case sensitive when writing it in your code.
- Optionally uncheck Use color scheme TODO default colors for a custom item font.
- Select OK or press
Enter.
Note
- The new pattern will appear below the others.
- After the creation, optionally check the box under Case Sensitive to make your patterns case sensitive when writing them in your code.
The new pattern will be ready to use and also visible in the TODO tool window.
To remove a pattern, select it, then select Remove  .
.
To edit a pattern, select it, then select Edit  . The Edit Pattern dialog, identical to the Add Pattern one described above, will appear.
Filters
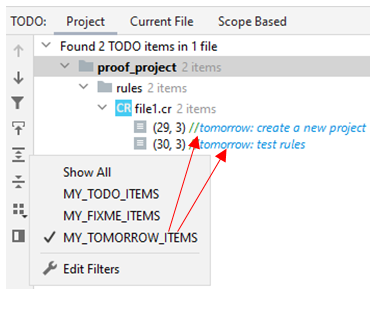
To filter your items associating them with a name you want, in the Filters panel:
- Select Add .
- In the Add Filters dialog, type a name in Name and select a pattern type under Patterns.
- Press OK or press
Enter.
Your named and filtered items will appear in the Filters panel and in the Filter TODO Items toolbar command menu.
| Toolbar menu | Filters panel |
|---|---|
 |
 |
To remove a pattern, select it, then select Remove .
To edit a pattern-name association filter, select it, then select Edit . The Edit Filter dialog, identical to the Add Filters one, will appear.