Lists
Project resources
The resources of a Knowledge Graph Customization project are lists of elements and information to be added to the baseline KG. They can be syncons, relations between syncons and syncons' user data.
Lists can be:
- CSV
- TXT
CSV list type lends itself to being represented in CSV format, and in fact they can be imported and exported as text files with that formatting.
They are used to provide definitions of any type of syncon, definitions of relations between syncons and user data for syncons.
TXT list type lends itself to being represented by plain text files and are only used to provide data for named entities.
In CSV list types, the definition of a syncon contains a set of accessory information (frequency, weight, domains, etc.), while in TXT list types, only the lemmas for each syncon are listed. Some example files in .csv format are available for download and immediate use.
Info
Unless otherwise specified, the procedures described below are applied in the Resources tab of the project dashboard.
Create a new list
To create a new list:
- Select Create list
 to start the list creation wizard.
 - In the Create new list dialog
- Enter the list name.
- Select the list type.
- Select Next.
-
If you choose Syncon list (CSV type) select:
- Create syncon to add a syncon definition.
- Create relation to add a relation definition among syncons.
- Create user data to add user data definition.
then select Next and follow the related procedure as described.
Or :
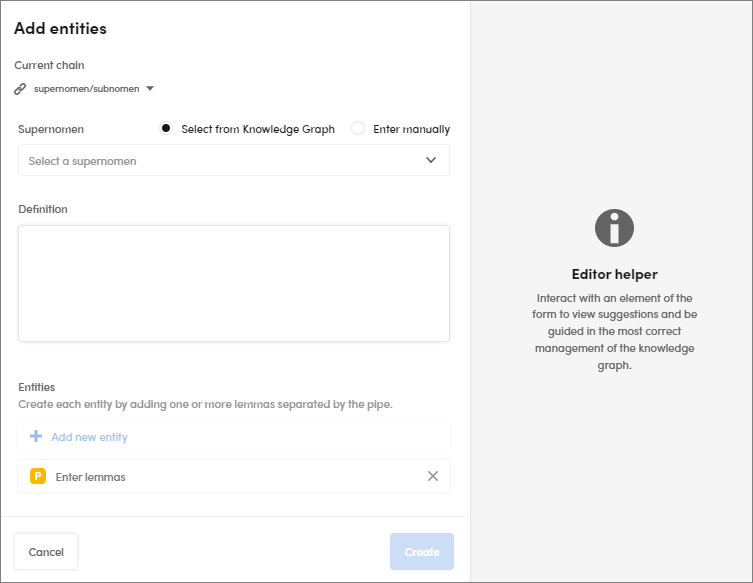
- If you choose Entity list (TXT type), the Add entitiesdialog is displayed.
- Select Current chain drop-down menu to enter the link type.
- Enter the item that is strictly dependent to the previous step. For example, if you selected a supernomen/subnomen link, enter the supernomenomen, or if you selected an omninomen/parsnomen link, enter the omninomen.
- Deselect Select from Knowledge Graph if you want to manually enter an ID. If Select from Knowledge Graph is selected, a list of possible matching syncons is displayed as you type. In the EDITOR HELPER panel a list of suggestions is displayed.
- Enter an optional definition in Definition.
- Enter lemmas in Enter lemmas. Lemmas can contain spaces. Use the pipe character (`|`) to separate multiple lemmas.
- Select Add new entity to add other entities.
- Select Create to end the procedure.
The created list is then displayed in the Resources panel.
Import a list
To import a list from a file:
- Select Import list
 at the top of the Resources panel. The Import new list wizard starts.
 - Set the list name and choose the list type, then select Next.
- Select Browse files to open the file, multiple selection is not allowed. If you want to replace the file, select Replace file and open a different file.
- Select Next.
If you selected Entity list during step 2, the Import entities dialog will appear:
- Select the link type in the Current chain drop-down menu and the separator character under Separator.
- Enter the item that is strictly dependent to the previous step. For example, if you selected a supernomen/subnomen link, enter the supernomenomen, or if you selected an omninomen/parsnomen link, enter the omninomen.
Note
Select Enter manually to directly type the item syncon ID.
- Type an optional definition under Definition and select Import.
Note
A list of suggestions to choose from is displayed in the Editor helper panel.
Browse lists
Find all the defined lists in the Resources panel.
Select a list to open it.
To filter the lists, enter a string of at least three characters in the search box of the Resources panel and press Enter: only the lists with matching names will be displayed.
Select the X button  in the search box to cancel the filter.
Edit list name
To edit the name of a list:
- Select the ellipsis
 on the right, under the dashboard toolbar, then choose Edit list name.
 - Enter the new name and select Save.
Validate a list
To validate a list, select Validate  on the right, under the dashboard toolbar.
Validation information will appear in the lower part of the window.
Download a list
To download a list:
- Select the ellipsis on the right, under the dashboard toolbar, then choose Download list.
- Accept or change the filename and select Download.
Info
The downloaded file is a ZIP archive containing the list itself—either a CSV or plain text file—plus a JSON file which is instrumental for importing the list elsewhere.
Delete a list
To delete a list, select the ellipsis on the right, under the dashboard toolbar, then choose Delete list.
Edit the list contents
To edit the list contents, select the list in the Resources panel, then use these procedures described in the next pages.