Knowledge Graph
The Knowledge Graph tool window is the main interface to the project's Knowledge Graph.
It shows information about syncons that have been selected in other tool windows, but can also be be used to search, navigate and explore the Knowledge Graph to find the syncons and lemmas needed for categorization and extraction rules.

The window contains three strips, from top to bottom:
- The variable name, "upwards linked syncons" strip, with a blue band on the left
- The syncons strip, with a red band on the left
- The variable name, "downwards linked syncons" strip, with a green band on the left
The entire colored band and the Expand  and Collapse
  buttons on the left of each strip act as toggle switches to turn on and off the full-window display of the strip.
Syncons strip
The syncons strip shows all the syncons matching a search but can also show the syncon that has been selected in other sections of the tool window or in another tool window.
In the rest of this article the term current syncon will be used to refer to the syncon that's selected in the syncons strip.
"Upwards linked syncons" strip
This strip shows syncons that are linked "upwards" with the current syncon along the link that's selected in the toolbar's Links drop-down list.
The strip name comes from the left part of the link name, so for example, if the link name is supernomen/subnomen, the strip is named Supernomen, and shows the parent of the current syncon in the supernomen/subnomen hierarchy.
"Downwards linked syncons" strip
This strip shows syncons that are linked "downwards" with the current syncon along the link that's selected in the toolbar's Links drop-down list.
The strip name comes from the right part of the link name, so for example, if the link is supernomen/subnomen, the strip is named Subnomen and shows the children of the current syncon in the supernomen/subnomen hierarchy.
Row elements
Stripes initially contain rows representing syncons.
Syncon rows can be expanded to show syncon lemmas, which are displayed in separate rows.
Rows representing syncons are identified by an icon that corresponds to the part-of-speech and they have these elements:
| Name | Description |
|---|---|
| Expand/collapse toggle switch | Button that shows or hides syncon's lemmas |
| Part-of-speech symbol | An icon corresponding to the syncon part-of-speech. |
| Lemmas column | A comma-separated sequence of syncon's lemmas; if there are many lemmas, the list is truncated and the number of items that are not displayed is shown at the end of the list prefixed by the plus sign (+) |
| F column | Syncon frequency |
| W column | Syncon weight |
| Definition column | Syncon definition (for Enterprise Edition only) |
| Domains column | Knowledge domains the syncon belongs to |
| ID column | Syncon identification number |
| Pin column | Pin toggle switch |
Note
In case of all project languages, the syncon definition will always be in English.
Rows that represent the lemmas of a syncon are marked by the icon with a capital L  and they have these elements:
| Name | Description |
|---|---|
| Lemmas column | The lemma plus possible properties like extra information, marked with capital letter E, and register information, marked with capital letter R |
| F column | Lemma frequency |
| W column | Lemma weight |
| Pin column | Pin toggle switch |
Part-of-speech icons
The icons that identify part-of-speech are:
| Icon | Part-of-speech |
|---|---|
 |
Common noun |
 |
Proper noun |
 |
Verb |
 |
Adjective |
 |
Adverb |
Toolbar
| Icon | Name | Description |
|---|---|---|
  |
Go Back and Go Forward | Go back and forth in the search history. |
| Search box and list | Specify the search criteria. The box has an auto-complete feature that automatically suggests lemmas while you type. The drop-down list shows the search history. | |
 |
Find | Start a search. |
 |
Match Case | When activated, results must match the case of the search criteria. |
| Links list | Knowledge graph links. After a search, only the links the current syncon belongs to are shown. | |
 |
Full Hierarchy View | Turn on and off the ancestry visualization in the "upwards linked syncons" strip. |
 |
Custom Data View | Turn on and off the display of additional information about the current syncon in the Custom Data panel that appears in the right part of the syncons strip. |
 |
Toggle Advanced Pin Mode | When activated, additional columns with alternative syncon IDs are shown on the right of the strips. |
 |
Clear | Clear the results, the search box and the list of pinned items, but not the search history. |
The Enter key can be used as an alternative to the Find button to start a search.
Context menu commands
| Name | Description |
|---|---|
| Pin / Unpin | Pin/unpin the current item |
| Pin All Lemmas | Pin all the current item's lemmas |
| Copy selected syncon Id | (Only for syncons) Copy the selected syncons IDs in the clipboard as a comma separated list |
| Copy All Lemmas | Copy all the lemmas to the clipboard |
| Set as Syncon ID 1 in Path Finder | (Only for syncons) Copy the ID of the current syncon in the Syncon ID 1 field of the Path Finder panel of the Knowledge Graph Search tool window |
| Set as Syncon ID 2 in Path Finder | (Only for syncons) Copy the ID of the current syncon in the Syncon ID 2 field of the Path Finder panel of the Knowledge Graph Search tool window |
Mouse commands
Multiple selection is possible.
Double-clicking an item—a syncon or a lemma—in the syncons strip acts as a toggle switch to pin or unpin the item itself.
Double-clicking a syncon in one of the two "linked syncons" strips makes the selected syncon become the new current syncon. It is displayed in the syncons strip and the other two strips are updated to show syncons that are linked with the new current syncon.
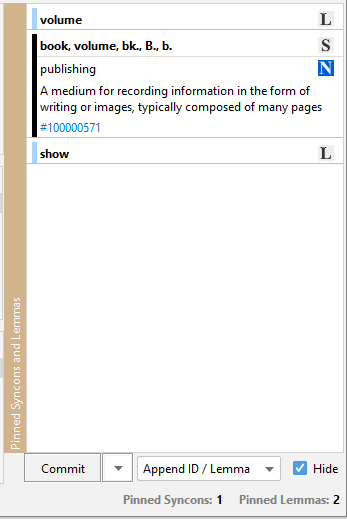
Pinned Syncons and Lemmas pane
Introduction
The Pinned Syncons and Lemmas pane allows managing pinned items and "commiting" their data to the cursor position in the rules files that's currently open in the editor.
This pane is similar to a clipboard, since pinning and committing resemble copy-and-paste operations.

The pane appears after the first item has been pinned and disappears if emptied.
Each pinned item has an identifying symbol on the right:
| Icon | Description |
|---|---|
 |
Syncon |
 |
Lemma |
Syncon information includes:
- Lemmas
- Knowledge domains the syncon belongs to
- Part-of-speech icon
- Definition (for Enterprise Edition only)
- ID
Note
The definition is not available if you pin your lemmas by selecting Pin All Lemmas.
Bottom toolbar
| Name | Description |
|---|---|
| Commit button | Paste pinned items' data at the cursor position in the current file inside the editor; what's actually pasted depends of the choice in Commit Format |
| Clipboard commands drop-down menu | Copy pinned items' data to the clipboard |
| Commit Format drop-down menu | Choose the format in which pinned items' data is committed or copied to the clipboard |
| Hide checkbox | Minimize the Knowledge Graph tool window after the commit action |
Note
The commit action is only successful if the current file in the editor is a rules file. Otherwise you will have an error.
Possible choices for Commit Format are:
| Value | Description |
|---|---|
| Append ID/LEMMA | Cose snippet containing the syncons' IDs and the lemmas |
| LIST | A LIST attribute code snippet containing the syncons' IDs and the lemmas |
| BLIST | A BLIST attribute code snippet containing the syncons' IDs and the lemmas |
| SYNCON | A SYNCON attribute code snippet containing the syncons' IDs |
| ANCESTOR | An ANCESTOR attribute code snippet containing the syncons' IDs |
| LEMMA | A LEMMA attribute code snippet containing the lemmas |
The clipboard commands drop-down menu has the following commands:
| Name | Description |
|---|---|
| Copy all lemmas of selected list items | Copy the lemmas of the selected items to the clipboard |
| Copy all lemmas of all list items | Copy the lemmas of the all pinned items to the clipboard |
| Copy code snippet | Copy a code snippet based on the value of Commit Format to the clipboard (see above) |
Context menu commands
| Name | Description |
|---|---|
| Unpin | Unpin the current item |
| Unpin all | Unpin all the items |
| Browse | (only for syncons) Open the selected syncons in the syncons strip, the first becoming the new current syncon |
| Copy selected syncon ID | (Only for syncons) Copy the selected syncons' IDs in the clipboard as a comma separated list |
| Set as Syncon ID 1 in Path Finder | (Only for syncons) Copy the ID of the current syncon in the Syncon ID 1 field of the Path Finder tab of the Knowledge Graph Search tool window |
| Set as Syncon ID 2 in Path Finder | (Only for syncons) Copy the ID of the current syncon in the Syncon ID 2 field of the Path Finder tab of the Knowledge Graph Search tool window |
Mouse commands
Multiple selection is possible.
Info bar
The info bar shows the number of pinned items, by type.
Info bar
The info bar is divided into three parts, from left to right:
- Current module indicator/selector
- Number of syncons in the syncons strip, in the upwards linked sysncons strip and in the downwards linked syncons strip
- Number of pinned items, by type.
The current module indicator/selector shows the language and the name of the current project module. The list allows switching to another module to change the context of syncons and lemmas selection.
Full hierarchy view
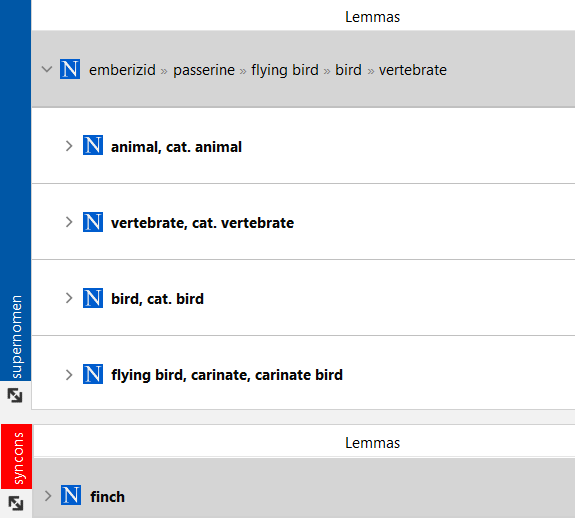
In full hirerachy view mode, the "upwards linked syncons" strip initially shows, instead of individual syncons, special items that comprise the hierarchical ancestry of the "parent" of the current syncon except for the root syncon of the hierarchy.
These items, when expanded, show all the syncons that make up that ancestry.
In the following picture, syncon emberizid is the parent of syncon finch in the supernomen/subnomen hierarchy.
In full hierarchy view mode, instead of the emeberizid sycon, the entire hierarchical path up to verterbrate is shown and, if the ancestry item is expanded, all the syncon along the path plus the root syncon of the hierarchy are showm from the most generic (animal) down to the more specific (emnberizid).

The syncons can then be expanded themselves to show their lemmas.
In this mode, the item representing the entire ancestry is described, in the Lemmas column, by a sequence of lemmas corresponding to the sycons along the hierarchical path, from the more specific to the more generic and far ancestor. Lemmas in the sequence are separated by double right-pointing angle quotation marks (>>).
To enter and exit this mode, use the Full Hierachy View button on the toolbar.