Classes
The Classes tool window allows managing the classes of output information of the project, that is:
- The domains to which categorization rules can give points
- The templates of the extraction records whose fields can be set by extraction rules
The tool window has two panels:
- Taxonomy
- Templates
- Tags
Taxonomy
The Taxonomy panel displays and allows managing the project taxonomy, that is, the tree structure in which categorization domains are defined.
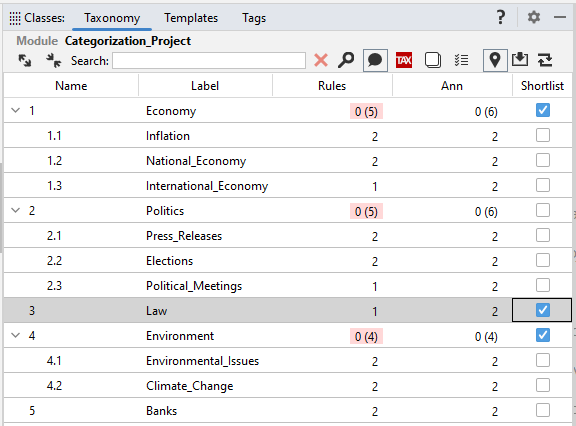
The default view is a table in which each row represents a first-level domain. Rows can then be expanded to reveal descendant domains.
Columns are:
| Name | Description |
|---|---|
| Name | Domain name |
| Label | Domain description |
| Rules | Number of categorization rules that give points to the domain |
| Ann | Number of times the domain was annotated as a target output category for test documents |
| Shortlist | Selection check box |
Info
Selected domains become part of the list from which you can choose when annotating target categories for a test document in the Project tool window or in the editor.
Context menu
| Name | Description |
|---|---|
| Expand node | Expand the current node. Available only if there are descendant domains |
| Compress node | Collapse the current node. Available only if there are descendant domains |
| Create rule | Create a rule based on the selected domain |
| Add node | Add a sibling domain, that is, a domain on the same level of the hierarchy |
| Add child | Add a child domain |
| Edit node | Modify domain name and/or label. |
| Delete node | Delete the domain |
| Copy node name | Copy the domain name |
| Copy node label | Copy the label name |
| Annotate checked nodes for file: YYYY | Annotate the selected domain as a categorization target for the test document YYYY that's currently opened and selected in the editor |
| Export Taxonomy | (for Enterprise Edition) Export the taxonomy in an .xlsx format containing domain and label names |
| Taxonomy Report | Export a taxonomy report in .csv format (for Enterprise Edition) with information about domain names, labels, total rules and annotations |
Note
Create rule appears only if a rule file is opened.
When more than one text file is opened, the context menu also has the following command:
| Name | Description |
|---|---|
| Annotate checked nodes for all opened test files | Annotate the checked domains as a categorization target for all the test files currently opened in the editor. Option available for more than one file opened |
Add node, Add child and Edit node commands open the Taxonomy Node dialog box. In it, the Generate command creates a suggested name for the domain. You can overwrite the suggestion and give the domain the name you prefer.
Toolbar
| Icon | Name | Description |
|---|---|---|
 |
Expand All | Expand all the nodes of the tree |
 |
Collapse All | Collapse all the nodes of the tree |
| Search: box | Specify search criteria | |
 |
Reset | Reset the search criteria |
 |
Find Next | Find the next match for the search criteria |
 |
Toggle Label Visibility | Toggle the display of the Label column |
 |
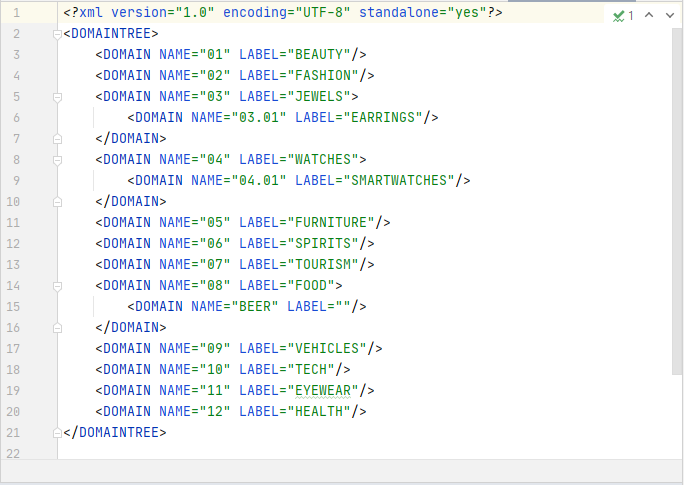
Open Taxonomy File | Open the taxonomy XML file |
 |
Uncheck All Nodes | Deselect all the checked nodes |
 |
Toggle Checked List | Toggle a summary view in which only checked domains are displayed |
 |
Show/hide annotations | Toggle the display of the Ann column |
 |
Import Taxonomy from file | Import a taxonomy from a .xls, .xlsx or .txt file formats, In Entrerprise Edition only |
 |
Refresh counters | Update rules and annotations counters |
Note
The Taxonomy panel and the taxonomy.xml file are synchronized, so each change made on one side is soon reflected on the other.
Other available mouse commands
| Command | Description |
|---|---|
| Double-click an item in the Name or in the Label columns | Open the Taxonomy Node window, where it is possible to modify the Name or the Label value |
| Double-click an item in the Rules column | Open the Rule Files window showing the list of files containing rules that give points to the domain. double-click on a file name to open the file in the editing area |
| Double-click an item in the Ann column | Open the Annotation Files window showing the list of files containing annotations of the domain. double-click on a file name to open the file in the editing area |
Info bar
The info bar shows the total number of nodes and the number of selected nodes.
Templates
The Templates panel displays project's extraction templates.
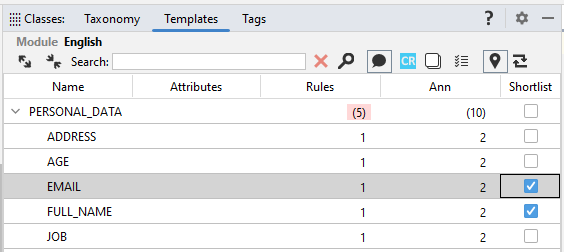
The default view is a table in which each row represents a template. Rows can then be expanded to reveal templates' fields.
Columns are:
| Name | Description |
|---|---|
| Name | Template and field name |
| Attributes | Field attributes |
| Rules | Number of rules that extract the fields. For templates, the number is bracketed and represents the sum of the counters for template's fields |
| Ann | Number of times the field was annotated as a target output extraction for test documents. For templates, the number is bracketed and represents the sum of the counters of template's fields |
| Shortlist | Selection check box |
Info
Selected fields become part of the list from which you can choose when annotating target extractions for a test document in the editor.
Context menu
| Name | Description |
|---|---|
| Expand node | Expand the current node. Available for templates only |
| Compress node | Collapse the current node. Available for templates only |
| Copy template name | Copy the template name |
| Copy field name | Copy the field name |
| Copy all template and fields | Copy all template and field names |
| Create rule | Create a rule based on the selected field |
| Export Templates Report | Export templates and related fields in a .csv file with information about number of rules and annotations (for Enterprise Edition) |
Note
Create rule appears only if a rule file is opened.
Toolbar
| Icon | Name | Description |
|---|---|---|
|
Expand All | Expand all the templates' nodes |
|
Collapse All | Collapse all the templates' nodes |
| Search: box | Specify search criteria | |
|
Reset | Reset the search criteria |
|
Find Next | Find the next match for the search criteria |
|
Toggle Attribute Visibility | Toggle the display of the Attributes column |
 |
Open Config File | Open the config.cr where templates are typically defined |
|
Uncheck All Nodes | Deselect all the checked nodes |
|
Toggle Checked List | Toggle a summary view in which only checked fields are displayed |
|
Show/hide annotations | Toggle the display of the Ann column |
|
Refresh counters | Update rules and annotations counters |
Other available mouse commands
| Command | Description |
|---|---|
| double-click an item in the Rules column | (For fields only) Open the Rule files window showing the list of files containing rules that give points to the field. double-click on a file name to open the file in the editing area. |
| double-click an item in the Ann column | (For fields only) Open the Annotation Files window showing the list of files containing annotations of the field. double-click on a file name to open the file in the editing area. |
Info bar
The info bar shows the total number of records and the number of the selected ones.
Tags
The Tags panel displays the tags defined in your project.
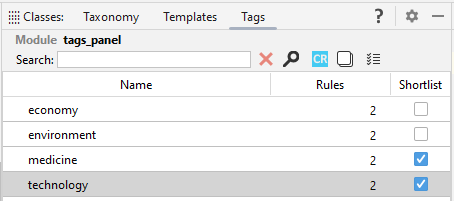
Its columns are:
| Name | Description |
|---|---|
| Name | Tag name |
| Rules | Number of categorization and extraction rules defined for the tags |
| Shortlist | Selection check box |
Context menu
The context menu has a single command:
| Name | Description |
|---|---|
| Copy tag name | Copy the tag name. |
| Export Tags Report | Export tags in a .csv file with their number of rules (for Enterprise Edition) |
Toolbar
| Icon | Name | Description |
|---|---|---|
| Search: box | Specify search criteria | |
|
Reset | Reset the search criteria |
|
Find Next | Find the next match for the search criteria |
|
Open Config File | Open the config.cr where templates are typically defined |
|
Uncheck All Nodes | Deselect all the checked nodes |
|
Toggle Checked List | Toggle a summary view in which only checked fields are displayed |
Info bar
The info bar shows the total number of records and the number of the selected ones.