Make experiments in categorization projects
Overview
Once the resources have been set up and the documents have been annotated, you can start experiments that consist of creating the categorization model and applying the model to a test library.
An experiment process is based on:
- Training library
- Test library
- Model
The training library consists of annotated documents that helps the model to learn. The training library must meet the following requirements:
- At least two annotated documents.
- At least two annotated categories.
- At least one category with ten annotations.
The test library, or test set, consists of an annotated document set parsed by the model in order to check it.
The model parses the test library in order to give the analysis results.
Platform provides the following model types for categorization projects:
- Auto-ML Categorization.
- Explainable Categorization.
- Bootstrapped Studio Project, that is a simplified version of the Explainable Categorization engine.
- Studio, that is an imported CPK.
The Auto-ML Categorization model type creates a Machine Learning model.
The Explainable Categorization model type creates a symbolic rule set which can be exported as CPK.
The Studio model type creates a categorization model based on an expert.ai Studio CPK imported project.
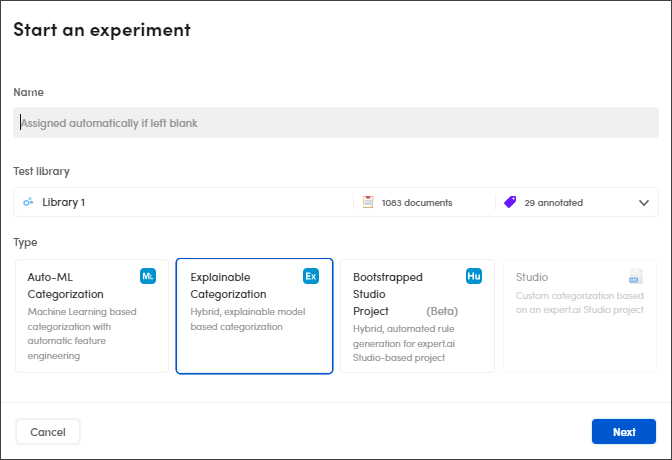
To start an experiment:
- In the upper bar, select Start an experiment
 .
. -
In the Start an experiment dialog:
-
Enter the experiment name in Name or leave empty for an automatic assignment.
-
Select the test library in the Test library drop-down menu.
-
Select the available engine type:
Or:
Or:
Or:
-
Select Next and follow the wizard.
-
-
Check the summary, then select Start to start the experiment.
The experiment progress window is displayed during the engine process.
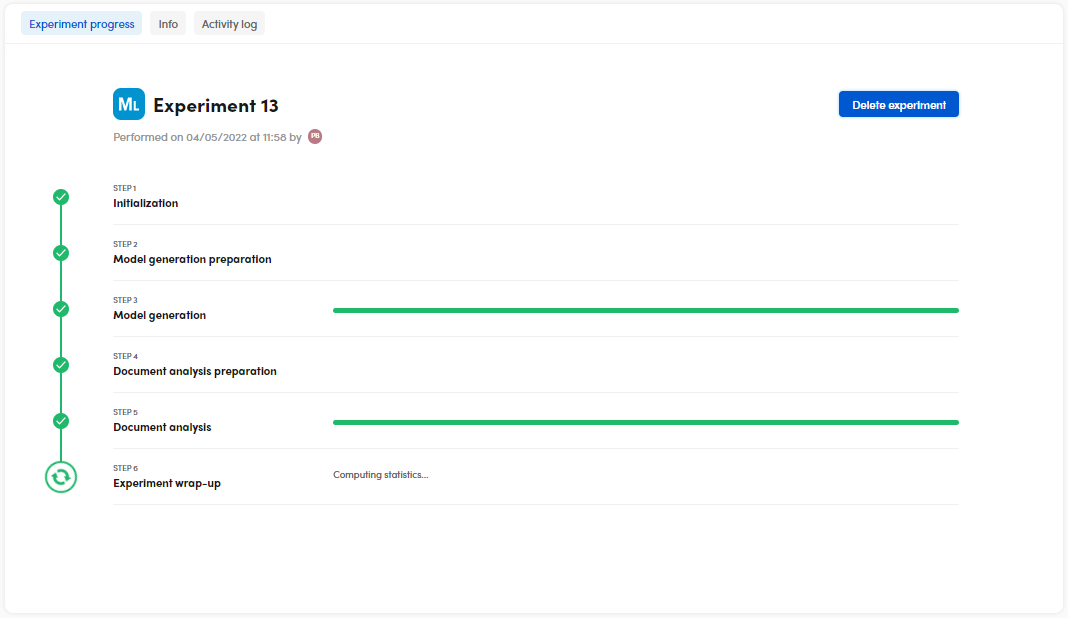
To terminate the process before its end, select Delete experiment.
The process consists of six sequential stages:
- Initialization
- Model generation preparation
- Model generation
- Document analysis preparation
- Document analysis
- Experiment wrap-up
Note
If the experiment fails, the Info tab appears displaying information and the type of errors. You can also check the Activity log tab for further information.
Once the process is completed, the analytics are displayed in the Experiments tab, Statistics sub-tab, where it is possible to analyze and interpret the results.
Note
Experiment results are associated to the test libraries you chose in the experiment wizard, so it is common that the Experiments tab is disabled for other libraries.
Auto-ML Categorization engine procedure
- Select the training library in the Training library drop-down menu.
-
Select the Training documents selection policy among:
- Only validated annotated documents (strict)
- Only validated or annotated documents (strict) (Selected by default)
- Prefer validated documents
- Prefer annotated documents
- Random selection
-
Select Hide advanced parameters if you don't want to display the advanced parameters and thus to avoid to set it manually. In the wizard they are marked with a blue caption in italics.
- Select Next to go on.
-
Select the Machine Learning model type (It is possible to select maximum three models to have multiple experiments in one time).
Warning
-
If you select one of the following models:
- Probabilistic SVM
- GBoost
- XGBoost
- Random Forest,
- Logistic Regression
- Multinomial Naive Bayes
- Complement Naive Bayes
the F-Beta parameters will not available.
Warning
-
If you select more than one model type, the following configuration windows:
- Problem definition
- Feature space
- Hyperparameters
- F-Beta
- Auto ML parameters
will not available in the experiment.
-
-
Select Next to go on.
- In Problem Definition:
- Select Enable strict "single label" mode to activate the single label mode. Off by default.
- Select Enable strict "Sub document categorization" compatibility mode to enable the trained model to use annotated strings of text to predict classes ("sub document categorization").
- Select Next to go on.
- Switch-off or switch-on Automatic features selection in Feature space (advanced): which data elements to use in feature vector creation to enable or disable the automatic selection of the best parameters combination.
- Select Next to go on.
- Select Activate Auto-ML on every parameter in Model-specific hyperparameters to enable automatic hyperparameters configuration. Deselected by default.
- Select Next to go on.
- Select the Precision and recall balance parameters (in Linear SVM, Custom Kernel SVM, and SGD models types only) then select Next to go on.
- Select the Machine Learning automatic self-tuning process parameters, then Next to go on.
Explainable Categorization engine procedure
- Select the training library in the Training library drop-down menu.
-
Select the Training documents selection policy among:
- Only validated annotated documents (strict)
- Only validated or annotated documents (strict) (Selected by default)
- Prefer validated documents
- Prefer annotated documents
- Random selection
-
Select Hide advanced parameters if you don't want to display the advanced parameters and thus to avoid to set it manually. In the wizard they are marked with a blue caption in italics.
- Select Next to go on.
-
In Generic parameters:
- Switch-on Enable "onCategorizer" optimization to enable the onCategorizer optimization.
- Switch-on Enable "strict" hierarchical mode to enable the strict hierarchical mode.
-
Switch-on Enable "single label" mode to enable the single label mode.
Note
If Enable "onCategorizer" optimization is disabled, the Fine tuning parameters are not available.
-
Select Next to go on.
- Select the Categorization rules generation hyperparameters, then Next to go on.
- Select the Fine tuning, then Next to go on.
- Select the Precision and recall balance parameters, then select Next to go on.
Bootstrapped Studio Project engine procedure
- Select the training library in the Training library drop-down menu.
-
Select the Training documents selection policy among:
- Only validated annotated documents (strict)
- Only validated or annotated documents (strict) (Selected by default)
- Prefer validated documents
- Prefer annotated documents
- Random selection
-
Select Hide advanced parameters if you don't want to display the advanced parameters and thus to avoid to set it manually. In the wizard hey are marked with a blue caption in italics.
- Select Next to go on.
- Select the Categorization rules generation hyperparameters, then Nextto go on.
- Select the Categorization "onCategorizer" optimization hyperparameters, then select Nextto go on.
Studio engine procedure
- Select the model in Model selection, then select Nextto go on.
- Check the remap in Remapper, then select Next to go on.
- Check the summary and, in the PDF document view drop-down menu, select:
- Never to analyze documents in plain text format.
- Mixed to analyze documents in Extract format when available, plain text otherwise.
- Strict to analyze only documents in Extract format.