Manage resources
It is possible to manage the taxonomy categories in the Resources tab.
Add a narrower category
To add a narrower category, which is a child node in the taxonomy tree:
- In the Resources panel, select the category of interest and select Create category
 .
. - In the New category window, confirm Broader category, which is the father node.
- Enter the category name in Category and then press
Enterto confirm and add the possible next ones. - Select Create.
Or:
- In the Resources panel, hover over the category of interest and select Create category
 .
. - In the New category window, confirm Broader category, which is the father node.
- Enter the category name in Category and then press
Enterto confirm and add the possible next ones. - Select Create.
Or:
- In the Resources panel, select the category of interest.
- In the Edit Category panel, select + Add narrower category.
- Enter the category name and then press
Enter.
Or:
- In the Resources panel, select the category of interest.
- In the Resources panel, select Create category
 in the upper bar.
 - In the New category window, select the Broader category, enter the category name in Category and then press
Enterto confirm and add the possible next ones. - Select Create.
Or:
-
Drag a category under a node.
Note
All its sub-categories are moved too.
Add a broader category
To add a broader category, which is a father node in the taxonomy tree:
- In the Resources panel, select the category of interest.
- In the Edit Category panel, under BROADER CATEGORY, enter the new category name in Add a broader category..., then press
Enter. - In the New category window, select Create.
Or:
- In the Resources panel, select Create category in the upper right corner.
- In the New category window, select No broader.
- Enter the category name in Category, then press
Enterto add the possible next ones. - Select Create.
Expand - Collapse the Resource
If a category has narrower categories, it is possible to expand and collapse the nodes:
- Click the expanding icon
 placed to the left of the category name to expand it.
 - Click the collapsing icon
 placed to the left of the category name to collapse it.
Or:
- Select the category and click Expand node
 or Collapse node
  placed to the right of the category name.
Or:
- Hover over the category and click Expand node
 or Collapse node
  placed to the right of the category name.
Move a category
To move a category, select a category, then drag it into the new position.
Note
To turn a narrowerer category into a broader category, select the narrowerer category, then drag it into the Taxonomy panel on the left.
Delete a category or multiple categories
To delete a category:
- Select a category, then select Delete category
 .
. - In the Delete category alert, select Delete to confirm.
Or:
- Hover over a category, then select Delete category
 .
. - In the Delete category alert, select Delete to confirm.
Or:
- Select a category, then select Delete category
 in the Edit Category panel.
 - In the Delete category alert, select Delete to confirm.
Or:
- Select a broader category from the Resources panel.
- In the Edit Category panel, under NARROWER CATEGORY, hover over a category and select Delete
 .
.
Or, to delete the relation between a broader and a narrowerer category:
- Select a narrowerer category from the Resources panel.
- In the Edit Category panel, under BROADER CATEGORY, hover over the category and select Delete .
To delete multiple categories:
- Select the categories using
CTRL+CLICKorSHIFT+CLICK. - Select
 .
. - Select Delete to confirm.
Note
If you delete a category, all the children nodes are also removed.
Search for a category in the taxonomy tree
To search for a category in the taxonomy tree, in the Resources panel, enter the category name (minimum three chars) in the search bar, then press Enter.
To reset your search for a new one, select ![]() at the right of the search bar.
at the right of the search bar.
Modify the category name
To modify the category name, in the Edit Category panel, enter the new category name under LABEL, then press Enter.
Modify the category description
To modify the category description, in the Edit Category panel, enter the new description under DESCRIPTION.
Show the category in resources
To show a narrowerer category in focus:
- Select it from the Resources panel.
Or:
- Select a broader category from the Resources panel.
- In the Edit Category panel, under NARROWERER CATEGORY, hover over the category and select Show resources
 .
.
To show a broader category in focus:
- Select it from the Resources panel.
Or:
- Select a narrower category from the Resources panel.
- In the Edit Category panel, under BROADER CATEGORY, hover over the category and select Show resources .
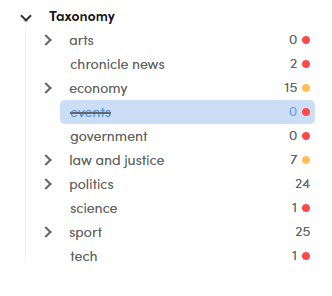
Check the number of documents belonging to a category
On the right side of the category name, the following items are displayed:
- The number of documents belonging to that category.
- A colored dot that represents the population amount.
 = Less than 6 documents annotated for the category.
 = Between 6 and 20 documents annotated for the category.
- No dots = more than 20 annotations
Note
The colored dots appear only after annotation.
Export the taxonomy
To export the taxonomy:
- In the Resources panel, select Export Taxonomy
 .
. - In the Export resources window, enter the filename or confirm the suggested one and confirm the extension in Extension.
- Select Export and the XML/RDF file will be available for the download.
- Select Download either in the dialog or in the notification in the lower right corner.
Browse the library
To browse the library filtered on the current category, select Browse library  .
.
Note
The documents of the current category are displayed in the Documents tab if they are categorized.
Exclude or include a category from the analysis in the experiments
Some categories or documents may have more or less relevance in the training, so to set a better strategy you can exclude or include them in the experiments.
To include/exclude a single category:
- Switch the Category extraction radio-button to exclude or include a category.
Or:
- In the Resources panel, search for a category in the search bar.
-
Select the ellipsis
 , then select:
- Enable filtered categories
Or:
- Disable filtered categories
Or, to include/exclude all categories:
-
In the Resources panel, select the ellipsis
, then select:- Enable all categories
Or:
- Disable all categories
Note
If the category has sub-nodes, a notification alerts you if you want to exclude/include them also.
Excluded categories are shown struck through in the taxonomy tree.
 .
.
Show suggested annotations documents
This option is available only for the taxonomy created with the Building magic Taxonomy procedure.
To show suggested annotations documents:
- Select the category in the Resources panel.
- In the Edit Category panel, select Show suggested documents
 .
.
The resulting documents are displayed in the Suggested Annotations Documents panel on the right.
- To collapse the panel, select Collapse
 .
. - To expand the collapsed panel, select Expand
 .
. - To close the panel, select Show suggested documents
 .
. - To sort the documents according to language and other options like relevance, name, annotations or categories, select the item in the related drop-down menus.
- To filter the documents by document name, enter the search criteria (min. three chars) in the search bar then press
Enter. - To reset the search criteria, select the X button on the right of the search bar.
-
To open the document in detail view:
- Double-click the document.
Or:
- Select the document name.
-
To show more content of a document, select show more.
Show the category IDs
To check the category ID:
- See Category ID in the Edit Category panel.
To show all the IDs beside the category label in the taxonomy:
- Select Project settings > Resources, then category label + ID and Save to confirm.
Note
The category IDs are automatically assigned and they are not editable.