Manage the taxonomy
In a categorization project, you can manage the taxonomy interchangeably in the Classes tool window or by modifying the taxonomy.xml file since changes made to one are automatically reflected in the other.
Note
When you create a project from scratch, Studio automatically defines a minimal taxonomy containing a few domains and some related categorization rules. Change this taxonomy according to your needs.
Classes tool window, Taxonomy tab
Navigate the taxonomy
- To go up and down, use the scrollbar and keys.
- To locate domains of interest:
- In Search enter the search criteria then select Find Next
 .
. - Review the results in the Find Results window.
- Double-click the result you are interested in to select.
- Use Reset
 to clear the search criteria.
- In Search enter the search criteria then select Find Next
- To list a subset of domains:
- In the Shortlist column check the domains you want to include.
- In the toolbar choose Toggle Checked List
 .
. - Use Uncheck All Nodes
 in the toolbar to restore the original view.
- To see the whole taxonomy select Expand All
 in the toolbar.
 - To see only the first level of the taxonomy select Collapse All
 in the toolbar.
 - To view the children of a domain select the right arrow
 head on the left of the domain name, to hide the children domains select the down arrow head
  .
. - To show or hide the Label column select Toggle Label Visibiliy
 in the toolbar.
 - To show or hide the annotations select Show/hide annotations
 in the toolbar.
 - To refresh the rules and annotations counters, select Refresh counters
 in the toolbar.
 - To automatically refresh the rules and annotations counters after a build operation:
- In the Studio Settings window, select Classes under Tool Windows.
- Set the Refresh Classes Counters after the build parameter to true.
Add domains
To add a domain at the same hierarchical level as an existing domain:
- Right-click the existing domain and select Add node.
- Set the name1 (required) and the description (optional) of the new domain and select OK.
To add a child domain:
- Right-click the parent domain and choose Add child.
- Set the name1 (required) and the description (optional) of the new domain and select OK.
Modify domains
-
Double-click the domain you want to modify.
Or:
Right-click the domain you want to modify and select Edit node.
-
Edit the name1 and/or the description, then select OK.
Delete domains
To delete a domain, right-click the domain and select Delete node.
Expand and collapse nodes
To expand and collapse children nodes, right-click the father domain and select Expand node.
To collapse children nodes, right-click the father domain and select Collapse node.
Create a rules based on the selected domain
To create a rule based on a selected domain, right-click a domain and select Create rule. A domain-based rule structure will appear in the editor.
Export taxonomy
To export your taxonomy in .csv format (only for the Enterprise Edition), right-click the Taxonomy tab and select Export Taxonomy.
In the notification in the lower right corner, select Open file to view it in the editor.
The taxonomy will be in the taxonomy sub-folder of the reports folder of the Project tool window.
Import taxonomy
This feature is available only in Studio Enterprise Edition.
To import a taxonomy:
- Select Import Taxonomy from file
 .
. -
Browse your file system to find the taxonomy file to import then select OK. Only
xls,.xlsxor.txtfile formats are allowed.Warning
If you already have a taxonomy, it is replaced by the imported one.
-
If you want to change the taxonomy node area, enter the new values in First row to import, First column, and Last column in the Taxonomy Node Area panel of the dialog.
-
If you want change the taxonomy ID, select an option in the Taxonomy ID panel of the dialog:
- Generated, then an automatically generated ID template in the drop-down menu.
- From data (selected by default), then the ID column from the drop-down menu.
- From cell, then enter a separator.
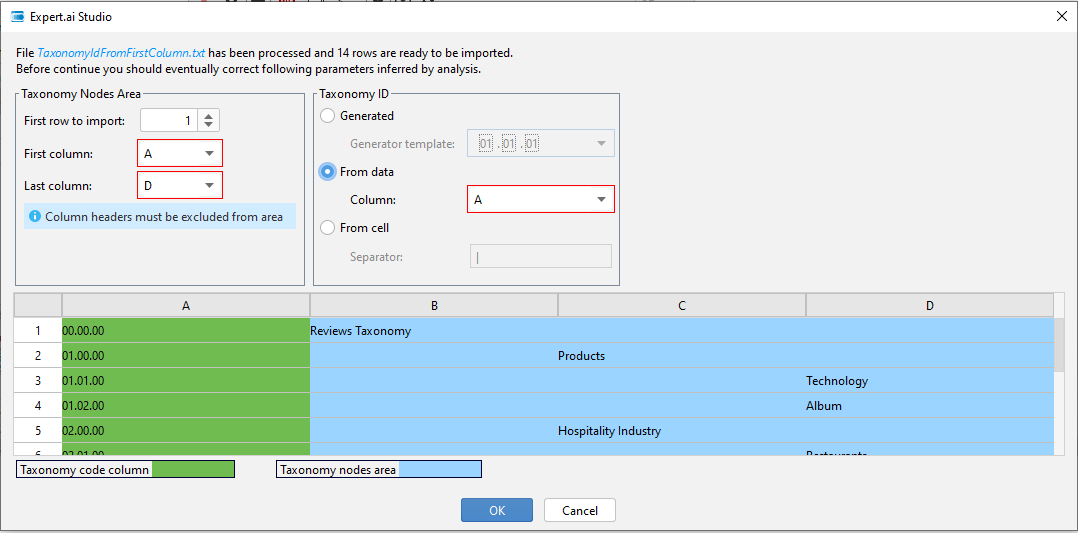
5 Select OK to confirm.
taxonomy.xml file
To manage the taxonomy through the taxonomy.xml file—that you can find in the Project tool window or selecting Open Taxonomy File  in the Classes tool window, Taxonomy tab—it is sufficient that you open the file in the editor and add, remove or modify nodes respecting the XML syntax and the following instructions:
-
Do not remove, modify or move the XML declaration:
<?xml version="1.0" encoding="UTF-8"?> -
Do not delete the
<DOMAINTREE>container element at the root of the XML hierarchy. - The elements corresponding to the domains must be named
DOMAINand have both theNAMEand theLABELattributes. - The
NAMEattribute must be set, while theLABELattribute can be left empty.