Annotate target categories
Annotating the target categories for a test document means indicating the expected categorization results for that document.
There are several areas of Studio IDE where you can annotate target categories:
- The Project tool window.
- The editor.
- The Classes tool window, in the Taxonomy tab.
- The Categorization tool window.
It is then possible to manage—modify or delete—the annotations using the Annotation tool window.
Set the list of categories to choose from
In the Project tool window and in the editor you use the context menu to annotate categories.
The context menu allows you to directly choose the category from a list or have a dialog in which you can insert any category.
Determine which categories appear in the list by checking them in the Taxonomy panel of the Classes tool window.
If you don't check any category, the list will show the one currently selected in the Taxonomy panel.
Categories that have already been annotated for the document are displayed in the list, but with gray ink, and cannot be selected.
To these categories, Studio adds other suggestions based on the results of analysis and user activities.
Annotate in the Project tool window
To annotate target categories using the Project tool window:
- Right-click the test document in the
testfolder (multiple selection is allowed) and select Annotate Category. - Select the category form the list. Categories that have already been annotated for the document are displayed with gray ink and cannot be selected.
Or:
- Select Annotate....
- In Taxonomy Node, enter the target category name or select from the drop-down menu.
- Select OK.
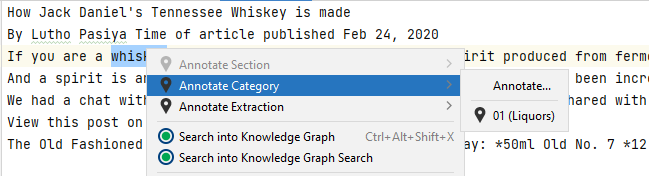
Annotate in the editor
In the editor you can annotate expected categorization results for the current test document:
- Right-click anywhere in the text of the file.
- Choose Annotate Category.
- Select the category from the list. Categories that have already been annotated for the document are displayed with gray ink and cannot be selected.
Or:
- Right-click anywhere in the text of the file.
- Select Annotate...
- In Taxonomy Node enter the target category name or select it from the drop-down menu.
- Select OK.
Annotate in the Classes tool window
- Open the test document or select it in the editor if it is already open.
- In the Taxonomy panel of the Classes tool window, right-click the target category and choose Annotate "XXXX" for file: YYYY, where XXXX is the name of the category and YYYY is the name of the document file.
Annotate in the Categorization tool window
Annotating in the Categorization tool window is useful because you can easily indicate if the categorization results you already obtained for a test document are correct or not.
First select Toggle Annotations Visibility  on the left panel toolbar to display the annotation toolbar, then use the annotation toolbar controls at the bottom of the left panel.
Annotate a category
- Select the category you want to annotate from the list of results.
- In the annotation toolbar choose Annotate.
Annotate all the categories
To annotate all categories, select Annotate All in the annotation toolbar.