Python Interpreter
Overview
Python Interpreter is a processor that runs a custom Python script that can process the block input and produce any output JSON.
Python version 3.10 is used to interpret the script. The interpreter support the standard library, but be aware that file system access is read-only.
Workflows containing Python Interpreter blocks can only be published in asynchronous mode.
Input
At runtime, any Python Interpreter block, by default, receives the implicit input, but the designer can define input variables and perform input mapping that allows feeding the block with input from multiple sources.
The input JSON is accessible to the code via the only parameter of the process function, whose default name is param but it can renamed at will.
For example, a block producing an output which is an exact replica of its input may have the following code:
def process(param):
    return param
while the code returning only a portion of its input, without further manipulations, could look like this:
def process(param):
    return {"onlycategories": param["document"]["categories"]}
Input variables, if any, are not used to validate the input JSON at runtime but only during interactive code validation and double as a template for workflow's input during interactive tests if the block is the first in the flow. Ultimately, it is the Python code of the block that possibly validates the input at runtime.
Input variables correspond to input properties that are managed in the Input tab of the block properties pop-up.
Block properties
The block properties are accessed by editing the block.
They are divided into these groups:
-
Basic properties:
- Block name
- Component version (read only)
- Block ID (read only)
-
Functional
The functional properties of the block coincide with the code of the script which is written with the code editor.
- To copy the script to the clipboard select Copy code to clipboard
 .
. - To restore the default code select Clear
 .
.
When writing the code, consider that the
processfunction must be defined and:- It must have an argument corresponding to the block input.
- It's return value will be the output of the block.
- To copy the script to the clipboard select Copy code to clipboard
-
Input
As illustrated above, by default, a block has no input properties because it doesn't have component-level input variables and the default input is the implicit input. It's however possible to define input variables and set input properties. This makes it possible to have the block receive an input alternative to the implicit input and possibly built with different upstream sources.
-
Output
The Output tab of the properties pop-up is where you optionally declare manifest of the block's output..
-
Basic
In this tab you can declare the top-level keys of the output object.
-
To declare a new key:
- Click the plus button: a new row is added below the list of existing keys.
- In the left field enter the name of the key.
- Using the drop-down on the right, choose the type of the key.
-
To modify an existing key:
- Edit the left field to change the name of the key.
- Use the drop-down on the right to choose a different type.
-
To remove an existing key, select Remove
 to the right of it.
-
-
Advanced
In this sub-tab of the Output tab you can declare the structure of the output object to the desired level of detail by writing a corresponding JSON template. To indicate the type of a property use these conventional values:
Value Type 0Number trueorfalseBoolean ""String {}Object []Array To add a portion of JSON taken from a possible input source:
- Choose the source name from the first drop-down menu on the right, the one that shows the names of the blocks
 .
. - Choose the top-level key from the second drop-down list, the one with the key icon
 .
.
To reset the JSON select Clear text
: the template is set to an empty object. - Choose the source name from the first drop-down menu on the right, the one that shows the names of the blocks
-
Output
A Python interpreter block must produce a JSON object.
You can optionally declare, at the desired level of detail, the manifest of the output object using the Output group of the block properties (see above). This declaration allows mapping the keys of the output objects to the input variables of downstream blocks.
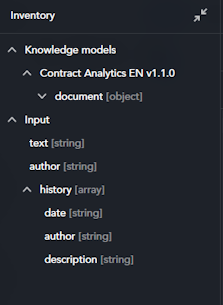
Inventory
To have a view of the possible data sources, use the Inventory panel to the left of the Functional tab of the properties pop-up.
To expand and collapse the panel select the expand  and collapse
  icons.
The panel shows, grouped by type, all the possible sources, that is the upstream blocks plus, possibly, the input format of the workflow, labeled Input.
For each source, the structure of the output object in displayed as a navigable tree.
Code validation
To validate the script, select Code validator  in the Functional tab of the properties pop-up. The extended view opens.
-
To specify the input JSON to test with:
- Write the JSON inside the Test input pane.
Or:
- Select Upload
 to load an input JSON from file.
-
To reset the input JSON select Clear
. - To start the test select Test code
 .
.
The Result panel shows the result, which is a JSON object in case of success or an error message.
To copy the result JSON to the clipboard, select Copy code to clipboard .
Full screen mode
To extend the pop-up to the entire browser window or to restore its original size, select Toggle full screen 
 .
.