Runtime view and API keys
Introduction
The Platform runtime is the set of computational resources—computers with their CPUs, RAM and storage—used to actually run the workflows.
In the Runtime view of the workflows dashboard, you can see the characteristics of the runtime. Select Runtime  on the left toolbar of the dashboard to display the view.
The toolbar at the top is the same as in all the other dashboard views.
The characteristics of the runtime are displayed on the left.
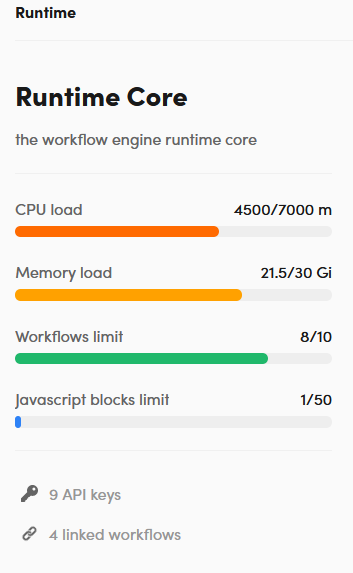
- CPU load indicates the allocated and maximum CPU load expressed in thousandths of one CPU. For example, the value 7000 corresponds to 7 CPUs.
- Memory load indicates the maximum and allocated memory load expressed in mibibytes or gibibytes.
- Workflows limit shows the current and the maximum number of published workflows.
- JavaScript blocks limit shows the current and the maximum number of JavaScript operators (or blocks) present overall in all published workflows.
The maximum values represent the runtime capacity. A new or modified workflow can be published only if:
- The workflows limit has not been reached.
- The required amount of computational resources is available.
- The number of any JavaScript blocks, added to the number of JavaScript blocks already present in all the published workflows, does not exceed the limit.
The other characteristics are the number of API keys and the number of workflows linked to those keys.
This view also allows you to manage the runtime API keys and publish workflows.
API keys
API keys enable programmatic use of workflows, instead of sharing user's credentials, by making requests to the workflow API.
It is an authorization mechanism: each request submitted to the API must contain, in a specific header, a valid key connected to the workflow.
Workflows with no API keys can still be used interactively in the Test panel of the workflow workspace.
The Runtime view shows first, at the top, the workflows to which no API keys are linked. Then, defined API keys are listed, whether or not they are linked to any workflow.
To show and hide the detail of the list items, use the toggle button on the left of the item.
As with the Workflows view of the dashboard, workflows are represented by cards or table rows. To switch between view modes, use the Show card view  and Show table view
  buttons on the toolbar.
The information displayed for each workflow and the action required to open a workflow in its workspace are the same as in the Workflows view of the dashboard.
For each API key, the number of associated workflows, the creation date and the name of the user who created it are reported.
Create an API key
To create a new API key select Add new API key at the bottom left of the view.
A wizard starts asking for the name and an identifying color for the key. Specify this information and select Create.
The generated key is shown in a dialog.
Warning
The key is only visible at this time. It is therefore necessary to copy the key before closing the dialog.
Select Copy to clipboard then paste the value in a safe place, such as a password manager.
Regenerate a key
API keys do not expire, but it's a recommended security practice not to use them for too long.
To regenerate a key, select it and choose Regenerate  on the toolbar.
Warning
Key regeneration immediately invalidates the old key with the same name, so any workflow API client applications using the old key value will stop working.
Link and unlink keys
To link a key to one or more workflows select the key and choose Link workflows  on the toolbar.
Select Add workflow then choose a workflow from the drop-down menu. Repeat to link more workflows.
To delete an existing key-workflow association, select the waste bin button on the right of the workflow item.
You can also manage key-workflow links when you publish workflows.
Delete a key
To delete an API key, select the key and choose Delete  on the toolbar.
Edit a key
To change the name or the identifying color of an API key, select the key and select Edit  on the toolbar.
Publish a workflow
In this view, it is also possible to publish workflows using their API keys as a reference.
To publish workflows using an API key as a pivot, select the key then select Publish  on the toolbar.
In the dialog that appears:
- Linked workflows are listed under Workflow. If you want to link more workflows to the same key, select Add workflow then choose the workflow from the drop-down menu.
- To delete an existing key-workflow association, select the waste bin button on the right of the workflow item.
- Select Save & Publish to save any changes to the key-workflow associations and, at the same time, publish any unpublished workflows associated with the key.
To publish a workflow by associating it with one or more keys, using the workflow as a pivot, select Publish workflow at the bottom left.
In the dialog that appears, first select the workflow from the first drop-down menu.
If the workflow is already linked to keys, these will be shown.
- To link other keys, select Add API key, then choose the key from the drop-down menu.
- To delete a key-workflow association, select the waste bin button on the right of the key item.
- Select Save & Publish to save any changes to the workflow-keys associations and, at the same time, publish the workflow.
Note
You can publish a workflow without an associated key. As hinted above, in this case you will still have the effects of publishing, because you will be able to test the workflow interactively, but you will not be able to use it through the API.
Switch to another view
To switch from a view to another, use the dashboard left menu.