Runtime view
The Runtime view of the NL Flow dashboard shows information about the NL flow runtime and allows managing API keys. API keys are linked to published workflows as an authorization mechanism: only calls to the NL Flow API containing a valid API key can work.
It also allows publishing and opening workflows.

Runtime information
The runtime is the virtual computer where published workflows are hosted and run.
NL Flow runtime information is displayed in the Runtime Core panel.
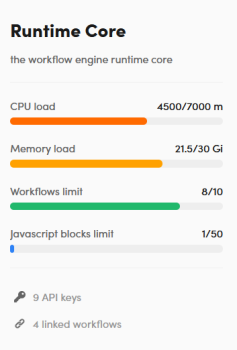
- CPU load shows allocated CPUs and the overall CPU capacity of the runtime. CPUs are expressed in thousandths of one CPU, so for example, 7000 m corresponds to 7 full CPUs, while 4500 m corresponds to 4 CPUs "and an half". The m suffix stands for "milli".
- Memory load shows allocated and maximum memory expressed in mibibytes or gibibytes.
- Workflows limit show the current and the maximum number of published workflows.
- Javascript blocks limit shows the current and the maximum number of JavaScript operators used in all published workflows.
The panel also shows the number of API keys and the number of workflows linked to those keys.
Workflows without API key
Above the list of API keys, the list of workflows not linked to an API key is shown. To show and hide the list use the toggle button to the left of the Without API key label.
Use the Show card view  and Show table view
  buttons on the area's toolbar to switch between table and cards visualizations for the list of workflows.
The information that is displayed inside the list is described in the article about the Workflows view. In table view this information is:
- Number of blocks
- Initials of the user that made the last edit
- Last edit time
- Publish state (the colored dot)
Browse API keys
For each API key, the number of linked workflows, the creation date and the name of the creator are displayed.
To show and hide the list of workflows linked to an API key use the toggle button to the left of key name. The information for each workflow is the same as in the list of workflows without a key (see above). Also the same visualzations—cards or table—apply.
Create an API key
To create a new API key select Add new API key at the bottom left of the page.
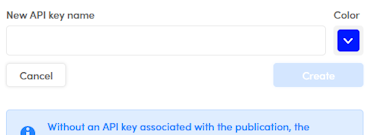
A wizard starts asking for the name and an identifying color for the key. Specify this information and select Create.
The generated key is shown in a dialog.
Warning
The key is only visible at this time. It is therefore necessary to copy the key before closing the dialog.
Select Copy to clipboard then paste the value in a safe place, such as a password manager.
Regenerate a key
API keys do not expire, but it's a recommended security practice not to use them for too long.
To regenerate a key, select it and choose Regenerate  on the area's toolbar.
Warning
Key regeneration immediately invalidates the old key with the same name, so any NL Flow API client application using the old key value will stop working.
Link a key to workflows
To link a key to one or more workflows:
-
Select any key from the list then select Link workflows
 on the area's toolbar. The Associate API key dialog appears.
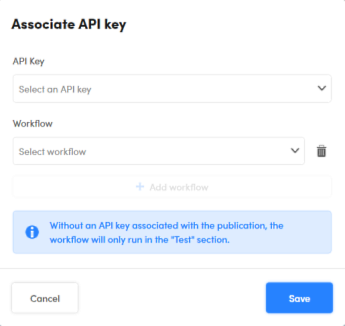
-
Select the key from the API Key drop-down list.
- Select the workflow from the Workflow drop-down list.
If you want to link the same key to more workflows:
- Select Add workflow: a new drop-down list appears.
- Select the workflow from the new drop-down list. Repeat from step 1 to link more workflows.
To remove a workflow from the list, select the trash can button  on the right of the workflow item.
Info
It's not needed that the workflow is published to link an API key to it.
You can also link a key to a workflow when you publish the workflow.
Delete a key
To delete an API key, select it from the list and choose Delete on the area's toolbar.
Edit a key
To change the name or the identifying color of an API key, select it from the list thenselect Edit  on the area's toolbar.
Open a workflow
To open a workflow that is listed under an API key or Without API key:
-
Table visualization:
- Double click the workflow row
Or:
- Select the workflow name
-
Cards visualization:
- Double-click the card
Or:
- Select the workflow name
The workflow is opened in its workspace where the default tab is Editor.
Publish workflows
To publish a workflow and link it to one or more API keys:
-
Select Publish workflow at the bottom of the left panel. The Publish workflow dialog appears.
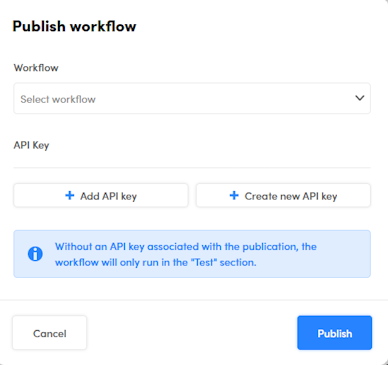
It is not mandatory to link API keys to the workflow, but a published workflow without a linked API key cannot be used with the NL Flow API, in can only be interactively tested in the Test tab.
-
To add a link to an API key:
- Select Add API key: a new drop-down list appears.
- Select the key from the new drop-down list. Repeat from the previous step to link more keys.
-
To remove the link with an API key, select Remove
 to the right of the key.
 -
To change a linked key, click its name. All API keys whose name contains that of the pre-selected key will be shown in a drop-down list, with the current key marked with a check mark.
- To view additional keys, edit the key name: all keys whose name contains what you type will be listed.
- To choose another key, select it from the list.
-
To create a new API key and link it to the workflow:
- Select Create new API key.
-
Enter the name of the key in New API key name, choose its color from the Color palette and select Create.
-
Copy the key value to the clipboard—possibly using the Copy key to clipboard
 button—then paste it and save it in a safe place.
-
-
When done with the API keys, select Next and complete the publishing wizard.
To publish one or more workflows linked to an API key:
-
Select any API key then select Publish
 on the area's toolbar. The Publish workflow dialog appears.
If the key is already linked to one or more workflows, they are listed under Workflow, otherwise a Select workflow drop-down list is displayed.
-
To add a link to a workflow:
- Select Add workflow: a new drop-down list appears.
- Select the workflow from the new drop-down list. Repeat from the previous step to link more workflow.
-
To remove the link to a workflow, select Remove
to the right of the key. -
To change a linked workflow, click its name. All workflows whose name contains that of the pre-selected workflow will be shown in a drop-down list, with the current key marked with a check mark.
- To view additional workflows, edit the workflow name: all workflows whose name contains what you type will be listed. If you remove all characters all workflows will be listed.
- To choose another workflow, select it from the list.
-
-
When done with the the selection of the workflows, select Next and complete the publishing wizard.
Switch to another view
To switch to another view of the dashboard, use the left menu described in the introduction to the dashboard.