Workflows view
Workflows is the default view of the NL Flow dashboard.
It allows you to create, import, browse, find, open and delete workflows. It also allows uploading previously exported models to use them in workflows.
Create, find and import workflows
To create, find and import workflows use the common toolbar described in the introduction to the dashboard, where you can also find how to switch between dashboard views.
To publish a workflow you can use the Editor tab of the workflow's workspace or the Runtime view.
Browse workflows
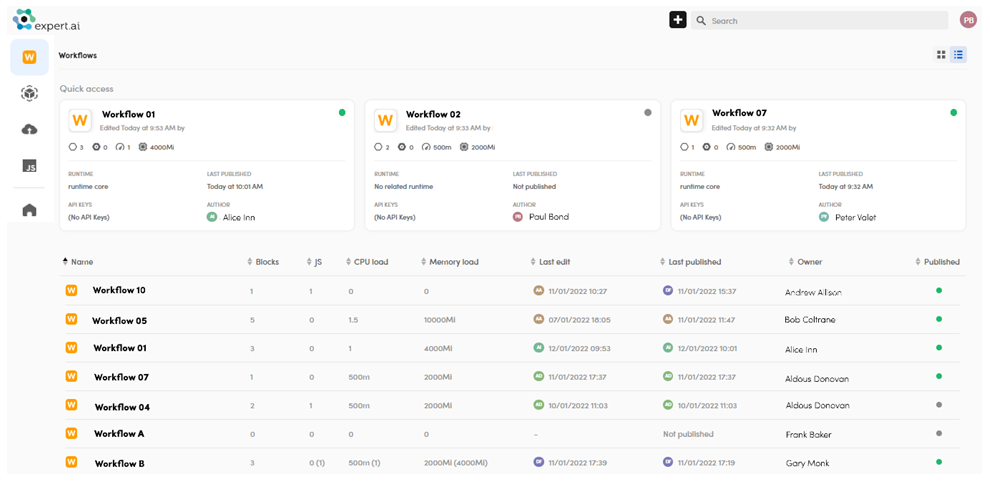
Most recently used workflows are shown in the Quick access strip, all workflows are listed below it. Use the Show card view  and Show table view
  buttons on the area's toolbar to switch between table and cards visualizations for the list.
To sort the list of workflows:
-
Table visualization:
- Sort the list based on the values of a column by selecting the corresponding column header. To toggle between ascending and descending order, select the column header repeatedly.
-
Cards visualization:
- Choose the desired sorting mode from the drop-down list at the top left of the cards panel.
Workflow information
Workflow summary information is displayed inside cards and table rows.
- The Blocks column in table view and the Blocks icon
 inside cards displays the number of blocks in the workflow.
 - The JS column in table view and the Javascript blocks icon
 inside cards displays the number of Javascript blocks in the workflow.
 - The CPU load column in table view and the CPU load icon
 inside cards display the number of CPUs or the thousandths of a CPU allocated to the workflow ("m" stands for "milli").
 - The Memory load column in table view and the Memory load icon
 inside cards display the amount of RAM allocated to the workflow, expressed in mibibytes or gibibytes.
 -
The Published column and the dot at the top right corner inside cards show the publishing status. Colors have the following meaning:
- Gray: not published
- Green: published, it can be tested interactively and used via the NL Flow API
- Orange: being published, not yet usable
- Yellow: being published and already usable
Open a workflow
To open a workflow:
-
Table visualization:
- Double-click the row
Or:
- Select the workflow name
-
Cards visualization:
- Double-click the card
Or:
- Select the workflow name
You can also open a workflow using the search box inside the common toolbar described in the introduction to the dashboard.
The workflow is opened in its workspace where the default tab is Editor.
Export a workflow
To export a workflow:
- Select the workflow to export.
- Select Export
 on the area's toolbar. A pop-up dialog appears.
 - If you want to change the default filename, enter a new name in the Filename field.
- Select Download to confirm the operation.
Delete a workflow
To delete an unpublished workflow (published workflow must first be unpublished):
-
Table visualization:
- Select the workflow row
Cards visualization:
- Select the workflow card
-
Select Delete
 on the area's toolbar.
Edit a workflow
To edit the name and the description of a workflow:
-
Table visualization:
- Select the workflow row
Cards visualization:
- Select the workflow card
-
Select Edit
 on the area's toolbar.
 - In the dialog, edit the name and the description.
- Select Save workflow.
Unpublish a workflow
To unpublish a workflow:
-
Table visualization:
- Select the workflow row
Cards visualization:
- Select the workflow card
-
Select Unpublish
 on the area's toolbar.
 - In the dialog, select Unpublish to confirm.