Transforming boundaries into segments
Once the dynamic segmentation rules have identified the possible segment boundaries, these must be processed in order to obtain the segments in their final form. This means that segments must be set up in pairs made of a left and a right boundary so that these two points can ideally be connected to outline the segment. However, sometimes the boundaries might not have a coherent arrangement or they might not be sufficient to create segments. In fact, segmentation rules can determine several potentially valid boundaries for each segment; but it may also occur that they are not able to define one of the two boundaries necessary for any segment to be created.
There is a standard algorithm governing the boundaries elaboration phase, which works without any intervention from the developer. However, it is possible to use some optional instructions with each segment in order to orient the process towards a desired result.
There are two groups of instructions: the first allows the user to set some additional segment definition options (see Segments Definition); the second manages priorities and resolves conflicts among pairs of segments (see Segments Priority).
Segments definition
Segments definition is an optional block of instructions to be used to define a set of constraints that affects the transformation of boundaries into dynamic segments.
The syntax to use for the segments definition is the following:
SEGMENTS DEFINITION
{
    SEGMENT(segmentName)
    {
        constraint
    }
}
where:
SEGMENTS DEFINITIONis a syntax keyword and must be written in uppercase.SEGMENTis the command that indicates which segment the instructions refer to. The segment’s name will be specified in parentheses after the syntax keywordSEGMENTand must respect the spelling and case used in the Section/Segment definition window, where the segment itself was declared.constraintrefers to one of the options available for the segments definition instruction. They are:BOUNDARYCLOSURELENGTHINTERVAL
The constraints have to be defined for each segment separately. Each set of constraints has to be contained in a SEGMENTS DEFINITION block, and each block can contain the constraints for one or more segments. It is possible to define one or more blocks of SEGMENTS DEFINITION instructions anywhere in a project source files but the constraints for a single segment can appear only once in a project. Each block of constraints associated to a single segment can specify one, several or all of the available constraint types.
Boundary
When a segment is created by defining its opening and closing conditions through segmentation rules, it is common that a single segment ends up having multiple rules that usually identify several possible beginnings and ends. Most of the times, it is useful (if not necessary) to choose just one between two potential beginnings and ends.
The segments definition option BOUNDARY defines which principle has to be followed when choosing a preferred beginning or end for a given segment. It is possible to set this behavior either based on the boundaries’ position or based on their score.
The syntax to set a segment BOUNDARY is the following:
SEGMENTS DEFINITION
{
    SEGMENT(segmentName)
    {
        BOUNDARY side = option
    }
}
where:
-
sidecan be:ENDBEGIN
If a
BOUNDARYside is specified, it will be possible to set the behavior of the beginning and end boundaries. The option may be set for both boundaries, or for just one of the two. Each time you useBOUNDARY, theBEGIN/ENDspecification is mandatory. -
optioncan be:POSITION:FIRST: it takes the boundary which occurs first among all potential boundaries.POSITION:LAST: it takes the boundary which occurs last among all potential boundaries.SCORE:HIGHEST: it takes the boundary with the highest score.SCORE:LOWEST: it takes the boundary with the lowest score.SCORE:HIGHEST THEN POSITION:FIRST: it takes into account the boundary with the highest score, if more than one is eligible then it takes the boundary which occurs first.SCORE:HIGHEST THEN POSITION:LAST: it takes into account the boundary with the highest score, if more than one is eligible then it takes the boundary which occurs last.
If the option BOUNDARY has not been set for a given segment, the default behavior is to validate the boundaries that generate the longest segment instance.
Closure
The fundamental aim of segmentation rules is to define dynamic segment boundaries. The BEGIN and END syntax allows the user to decide exactly where a segment has to begin and where it has to end. However, there could be cases in which lone boundaries might occur: they are called "orphan" boundaries. The segments definition option CLOSURE allows the user to define an automatic identification of the missing boundary and therefore an automatic closure of segment.
The syntax to set a segment CLOSURE is the following:
SEGMENTS DEFINITION
{
    SEGMENT(segmentName)
    {
        CLOSURE boundaryType = option
    }
}
where:
-
boundaryTypecan be:ENDBEGIN
If a
CLOSUREboundary type is specified, the behaviors of theBEGINandENDboundaries could be separately set. The automatic closure can be defined for both boundaries or for only one of the two.CLOSURE BEGINwill set the condition for the automatic identification of the segment closure.CLOSURE ENDwill set the condition for the automatic identification of the segment beginning. -
optioncan be:SENTENCE: if the orphan boundary type isBEGIN, the missing boundary will be identified in the sentence following the orphan boundary. If the orphan boundary type isEND, the missing boundary will be identified in the sentence preceding the orphan boundarySENTENCE*n: if the orphan boundary type isBEGIN, the missing boundary will be identified in n sentences following the orphan boundary. If the orphan boundary type isEND, the missing boundary will be identified in n sentences preceding the orphan boundary.-
PARAGRAPH: if the orphan boundary type isBEGIN, the missing boundary will be identified in the paragraph following the orphan boundary. If the orphan boundary type isEND, the missing boundary will be identified in the paragraph preceding the orphan boundary. -
PARAGRAPH*n: if the orphan boundary type isBEGIN, the missing boundary will be identified in n paragraphs following the orphan boundary. If the orphan boundary type isEND, the missing boundary will be identified in n paragraphs preceding the orphan boundary. SECTION: if the orphan boundary type isBEGIN, the missing boundary will be identified with the end of the section containing the orphan boundary. If the orphan boundary type isEND, the missing boundary will be identified with the beginning of the section containing the orphan boundary.SECTION*n: if the orphan boundary type isBEGIN, the missing boundary will be identified with the n sections containing the orphan boundary. If the orphan boundary type isEND, the missing boundary will be identified with the beginning of the n section containing the orphan boundary.
Warning
A segment can not span over two different sections. When an orphan boundary is found within a section and the input document contains more than one section, the closure options SENTENCE or PARAGRAPH might not behave as expected. In fact, if the defined closure falls out of the section containing the orphan boundary, then the closure option will not be respected and the segment will be closed where the section ends or begins.
Length
The segments definition option LENGTH defines the maximum extension a segment can span over. The unit of measure is the number of sentences or paragraphs between the two boundaries of a segment. This is useful to avoid triggering unwanted segments with boundaries which are too far apart from each other.
The syntax to set a segment LENGTH is the following:
SEGMENTS DEFINITION
{
    SEGMENT(segmentName)
    {
        LENGTH = option
    }
}
Where option refers to either SENTENCE or PARAGRAPH. In both cases it is also possible to specify the number of sentences or paragraphs that the segment must extend over. The syntax is the following:
SEGMENTS DEFINITION
{
    SEGMENT(segmentName)
    {
        LENGTH boundaryType = SENTENCE|PARAGRAPH*n
    }
}
If the LENGTH option is not specified in the SEGMENT DEFINITION, any segment of any length will be considered to be valid. Otherwise, segments exceeding the length constraints will be removed.
Interval
Segments can be instantiated once or multiple times in each document, depending on the document, on the rules and on the project needs. The segments definition option INTERVAL defines this behavior.
The syntax to set a segment INTERVAL is the following:
SEGMENTS DEFINITION
{
    SEGMENT(segmentName)
    {
        INTERVAL = MULTIPLE|SINGLE
    }
}
If the INTERVAL is set to MULTIPLE, all instances of the segment found within a document will be returned. If the INTERVAL is set to SINGLE, on the other hand, only one instance of a given segment will be chosen among those available. If SINGLE is chosen, it will also be necessary to declare which instance has to be chosen if several of them have are present. The syntax is the following:
SEGMENTS DEFINITION
{
    SEGMENT(segmentName)
    {
        INTERVAL = SINGLE:option
    }
}
Where option refers to one of those available:
FIRST: the first segment instance in the text.LAST: the last segment instance in the text.LONGEST: the longest segment instance in the text, that is to say the segment containing the highest number of sentences or characters when two or more segments share the same number of sentences.SHORTEST: the shortest segment instance in the text, that is to say the segment containing the lowest number of sentences or characters when two or more segments share the same number of sentences.HIGHEST: the segment instance with the highest score.LOWEST: the segment instance with the lowest score.
HIGHEST and LOWEST can be combined with FIRST and LAST for prioritization as follows:
INTERVAL = SINGLE:HIGHEST THEN SINGLE:FIRST
INTERVAL = SINGLE:HIGHEST THEN SINGLE:LAST
INTERVAL = SINGLE:LOWEST THEN SINGLE:FIRST
INTERVAL = SINGLE:LOWEST THEN SINGLE:LAST
This means: in case of more segments having the same highest or lowest score, the first or the last segment instance is considered.
If a segment interval is not defined in the segments definition, the segment will admit multiple instances by default.
Segments priority
Segments priority is an optional block of instructions that allows users to set a scale of priority among two segments and define, manage and solve conflicts among different overlapping segments, so that the segments themselves can be reshaped to avoid any overlap.
The syntax of SEGMENT PRIORITY is the following:
SEGMENTS PRIORITY
{
    segmentName1 ALWAYS segmentName2
}
where:
SEGMENTS PRIORITYis a syntax keyword and must be written in uppercase.segmentName1andsegmentName2refer to the segment names the instruction applies to. The names must be spelled in the same exact way as they are when the segments are declared.ALWAYSis a syntax keyword and must be written in uppercase.
The operator ALWAYS is used to solve conflicts by identifying the first segment in the expression as always dominant over the second, when the two overlap. In fact, if we set the SEGMENTS PRIORITY as follows:
SEGMENTS PRIORITY
{
    A ALWAYS B
}
the segment A will maintain its original extension whereas the segment B will be cropped: its beginning has been pushed forward compared to its original extension so that it now starts where the segment A ends, thus removing the original overlap.
More specifically:
-
If segment
Bis entirely contained in segmentA, the former will be cut.
-
If segment
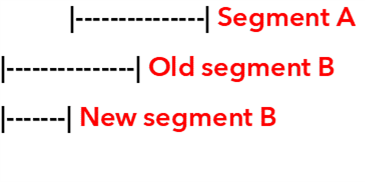
Bis partially contained in segmentA, the overlapping part of the former will be cut, either on the right or on the left.Left cut Right cut 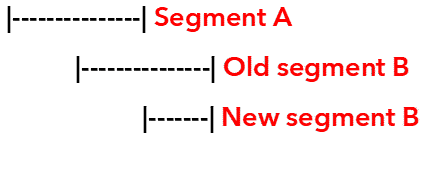
-
If segment
Bentirely contains segmentA, the overlapping part of the former plus its non-overlapping part on the right will be cut.
If the priority scheme is inverted:
SEGMENTS PRIORITY
{
    B ALWAYS A
}
the end of the segment A will be pushed backwards to avoid any overlap with the segment B, which will maintain its original beginning.
Segment boundaries elaboration process
By definition, all types of segments lie on separate planes and do not influence each other. Therefore, segments are validated separately. In the end, if any segment priority instruction has been defined, the segments affected by these instructions will be reshaped based on the specified criteria.
The process that leads to segments creation and validation is composed of four phases.
Phase A: boundaries and closures validation
Segments are validated by taking into account BOUNDARY and CLOSURE criteria, thus verifying the following conditions:
- If the segments definition does not contain instructions for
BOUNDARYandCLOSURE, a defaultBOUNDARYinstruction will be applied, that is to sayBOUNDARY BEGIN=POSITION FIRSTandBOUNDARY END=POSITION LAST. Any orphan boundaries will not be taken into account as noCLOSUREinstruction will be applied. - If the segments definition does not contain
BOUNDARYinstructions, but containsCLOSUREinstructions, a defaultBOUNDARYinstruction will be applied, that is to sayBOUNDARY BEGIN=POSITION FIRSTandBOUNDARY END=POSITION LAST. All orphan boundaries will be closed according to theCLOSUREinstructions specified: the segments resulting from this process can neither overlap each other, nor can they overlap the segments already defined by the defaultBOUNDARYinstructions. - If the segments definition contains
BOUNDARYinstructions, but does not containCLOSUREinstructions, allBOUNDARYinstructions will be applied and orphan boundaries will not be taken into account as noCLOSUREinstruction is present. - If the segments definition contains both
BOUNDARYandCLOSUREinstructions, first allBOUNDARYinstructions will be applied, then the specifiedCLOSUREwill be applied to the remaining orphan boundaries.
Phase B: length filter
LENGTH filters (if any) are applied and all the segments that do not satisfy them are discarded.
Phase C: interval control
Segments for which INTERVAL criteria have been specified are reworked if it is necessary to generate a single segment instance.
Phase D: priority reshaping
Segments belonging to a group with PRIORITY criteria are reshaped.