Models view
The Models view of the NL Flow dashboard shows the inventory of models that are in use or can be used in workflows.
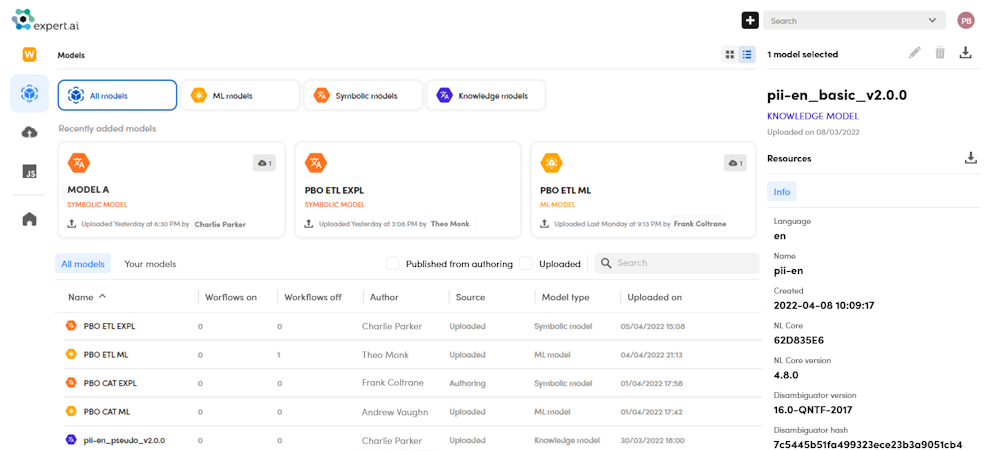
Knowledge models are built-in, while all the other models have either been published from the authoring application—if available—or uploaded from previously exported files.
In this view you can browse, download, upload, rename, delete models and get detailed info about them.
Get statistics
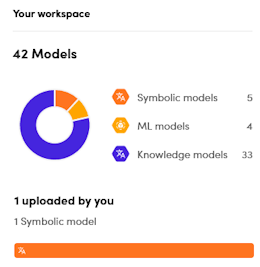
When no or more than one model is selected, the right panel shows statistics: how many models there are, how they are distributed by type, how many have been uploaded by you.
Browse models
The most recently added models are listed on the top while all models are listed below them.
Use the Show card view  and Show table view
  buttons on the area's toolbar to switch between table and cards visualizations.
-
To sort the list of models:
-
In table view:
- Sort the list based on the values of a column by selecting the corresponding column header. To switch between ascending and descending order, select the column header repeatedly.
-
In cards view:
- Choose the desired sorting mode from the drop-down list at the top left of the cards panel.
-
-
To filter the list based on model type use the buttons in the upper part of the area.

-
To switch between the list of all models and the list of the models authored or upload by you, select the All models and the Your models tabs at the top of the list.

-
To list only models that were published from the authoring application, check Published from authoring at the top of the list.
-
To list only models that were uploaded in NL Flow from a file, check Uploaded at the top of the list.
-
To filter the list based on the name of the model, type in the search box at the top of the list and press
Enter. Only workflows with matching names will be listed. The match is case insensitive.
Select the X icon inside the search box to cancel the filter.
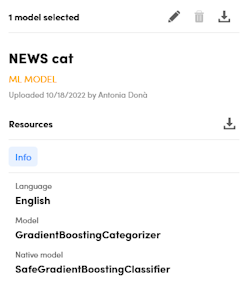
Model information
Basic model information is displayed inside cards and table rows.
The Workflows On column in table view and the Workflows on icon1  inside cards shows the number of published workflows using the model.
The Workflows Off column in table view and the Workflows off icon1  inside cards shows the number of unpublished workflows using the model.
-
To have detail information about a model, select it. Information is displayed in the rightmost panel.
If the model is referenced as a block in one or more workflows, the list of the workflow is displayed.

Workflow information is described in the article about the Workflows view.
To open a workflow in the Editor tab of the workflow's workspace, select its name.
Under Resources, the Info tab shows the supported language and detailed info on the technological components on which the model is based.
The Classes tab is present for models that perform information extraction. It lists the classes of information that the model can extract.
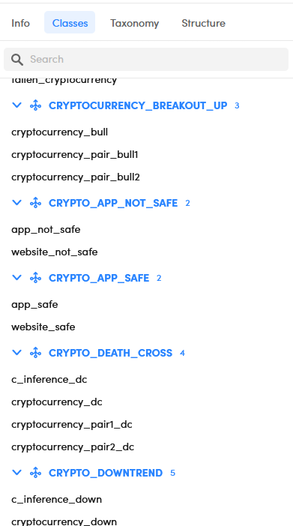
Classes are divided into groups. Next to the name of each group is the number of classes it contains.
- To collapse and expand a group select the arrow icon to the left of the group name.
The Taxonomy tab is present for models that perform categorization. It shows the category tree.
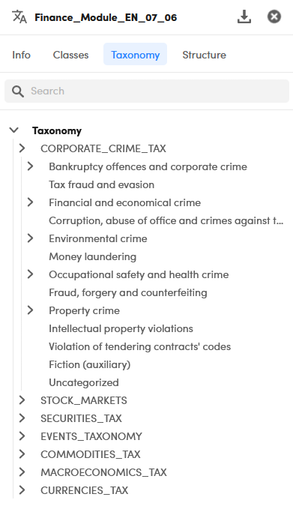
-
To expand and collapse tree nodes:
- Use the arrows to the left of the node name.
Or:
- Select Expand node
 or Collapse node
  to the right of the category name.
The Structure tab is present if the model contains the definition of sections or segments.
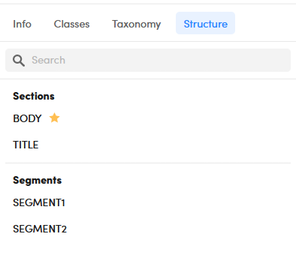
The definition of sections can imply that the model is able to accept and exploit—for the purpose of categorization or extraction—an input text divided into sections.
The definition of segments indicates that the model has segmentation rules by which it can detect segments of text with specific features and use them as the scope of the categorization or extraction rules.
Input sections and detected segments can also be part of the model output.
-
To filter the contents of the Classes, Taxonomy and Structure tabs, type one or more characters in the search box inside the tab and press
Enter. To cancel the filter select the X icon. -
To export all the model information in a JSON file, select Export
 to the right of Resources.
Upload a model
To upload a model:
- Use the common toolbar described in the introduction to the dashboard, where you can also find how to switch between dashboard views.
Or:
- If no model has been selected, select Upload Symbolic model or Upload ML model in the rightmost panel.
The Upload model pop-up dialog appears.
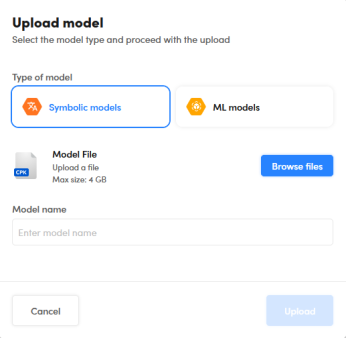
- Change the pre-selected model type if needed.
- Select Browse files and locate the model package file.
- Enter the model name.
- Select Upload.
Info
The maximum allowed file size is 4GB.
It is also possible to upload a model in the Editor tab of a workflow's workspace.
Download a model
To download a model:
-
In table view:
- Select the model row.
In card view:
- Select the model card.
-
Select Download
 on the toolbar of the rightmost panel: the Export model dialog appears.
 - If you want to change the default filename, enter a new name in the Filename field.
- Select Download to confirm the operation.
Delete models
To delete one or more models:
-
In table view:
- Select the model row.
In card view:
- Select the model card.
Multiple selection with
CtrlandShiftis available. -
Select Delete
 on the toolbar of the Model Info area in the right panel.
Warning
Built-in knowledge models cannot be deleted, but you can delete models of other types even if they are used in workflows.
Rename a model
To rename a model:
-
In table view:
- Select the model row.
In card view:
- Select the model card.
-
Select Edit
 on the toolbar of the rightmost panel.
 - Enter the new name in Model name.
- Select Save to confirm.
Note
You cannot rename built-in knowledge models.
Download model resources
To download the single model resources in JSON format:
-
In table view:
- Select the model row.
In card view:
- Select the model card.
-
Select Export
on the toolbar of the rightmost panel besides Resources.
Switch to another view
To switch to another view of the dashboard, use the left menu described in the introduction to the dashboard.