Create a thesaurus project
Start the procedure
- Go to the main dashboard.
- Select the plus button
 on the main toolbar and then Thesaurus project.
Alternatively:
- If there are no projects, select the Thesaurus project card.
- If there are other projects, but no thesaurus, select Thesaurus
 on the left menu, then Create your first project.
 -
If there are other thesaurus projects:
- Select Thesaurus on the left menu, then select New Thesaurus project
 in the Create project area in the right column.
Or:
- Select New Thesaurus project in the Create item area.
- Select Thesaurus
The New Thesaurus project dialog will appear.
-
Enter the project name, select the Tech version and optionally enter a description for the project.
Warning
The Tech version cannot be changed once the project has been created.
-
Select Create.
The creation wizard will start.
The project creation wizard
To quit the wizard at any step:
- Select Exit wizard from the toolbar.
Or:
- Select the expert.ai icon in the upper left corner of the page.
The Save changes dialog will appear.
Select:
- Cancel to close the dialog.
- Delete project to quit the wizard and delete the project.
- Save to save the project and quit the wizard, so that the project can be opened from the main dashboard at a later time to complete the wizard.
Languages
In the first step of the wizard you choose the languages for your project.

- Select one or more languages. The first language you select is automatically marked as favorite
 . In case of multiple languages, select the star
  beside one of them if you want to make it the favorite.
 - Select Next.
Settings
In the second step of the wizard you decide the project settings.
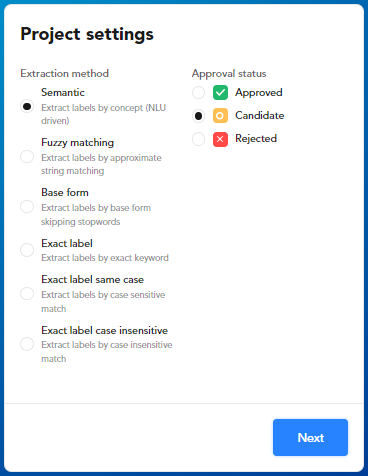
- Check and possibly change the default extraction method and approval status for new concepts.
- Select Next.
If you import a thesaurus in the next step with a pre-defined extraction method and validation, these settings will prevail over those you manually set.
Resources
In the third step of the wizard you start defining the thesaurus. You can always change it later.
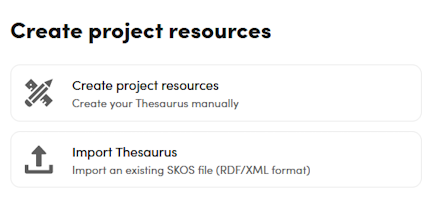
You need to define at least one concept to start with.
- To enter concepts by hand, select Create project resources and Next: the Create Thesaurus dialog appears.
- Enter a label for a concept and press
Enter. - Repeat the step above if you want to define more concepts.
- Select Next when done.
Or:
- To import a SKOS definition from file, select Import Thesaurus.
- Browse the file system to locate and open the RDF/XML format file.
- Select Next.
Defined concepts are displayed in two panels, Resources and Edit concept, where you can edit them. In the Resources panel you can also create and manage sections, custom relations and custom properties. You can do it later, if needed, once the project has been created.
Select Next when done.
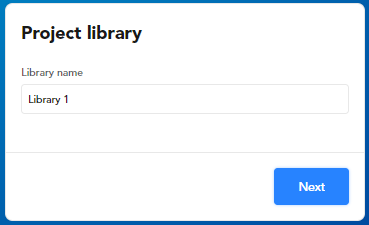
Library
In the fourth step of the wizard you create the default document library for the project.
Info
In thesaurus projects the training stuff for model generation is constituted by the thesaurus itself, so no training library is needed. Libraries are nevertheless useful to get automatic suggestions for new concepts and labels and also to test models.
You need to have at least one document in the library and you can add more later.
- Enter the library name in Library name or confirm the suggested name, then select Next.
-
In Corpora and folders, select the sources for the library. You can select corpus projects or upload documents from the file system to create in-project corpora.
You can use these tools to display and filter corpora:
- The search bar to filter corpora by name. Your search must contain at least three characters.
- Show table view
 to have corpora listed in a table. When in table view, you can sort items by selecting the desired column header.
 - Show card view
 to display corpora as cards. When in card view, select Share
  to share the corpora with other users.
The information displayed for corpora is the same displayed in the Corpus info sub-panel of the main dashboard.
Info
Available corpus projects are only those based on the Tech version you selected before staring the wizard.
To create an in-project corpus by uploading files, select Upload and proceed as explained in the article dedicated to the topic. When the upload is complete, the in-project corpus is listed along with the other corpora.
When all the document sources are available, select them from the list.
-
Select Next. The documents will be processed to create the library.
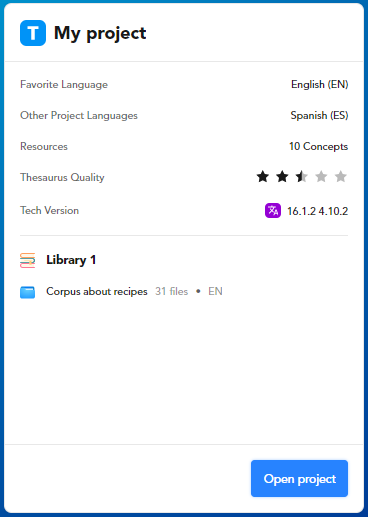
Summary
The last step of the wizard sums up project information and allows you to open the project.
Info
Thesaurus Quality is a measure of how much the default library covers defined concepts.
Select Open project to end the wizard and open the project.