Make experiments in extraction projects
Overview
During an experiment you train a model1 for your extraction project and have it automatically tested against a library to determine its quality. Generated models can then be published to NL Flow.
The training library must meet the following requirements:
- At least ten annotated documents.
- At least one class with ten annotations.
The test library should have been thoroughly annotated so that the test can produce useful metrics.
Start an experiment
To start an experiment:
-
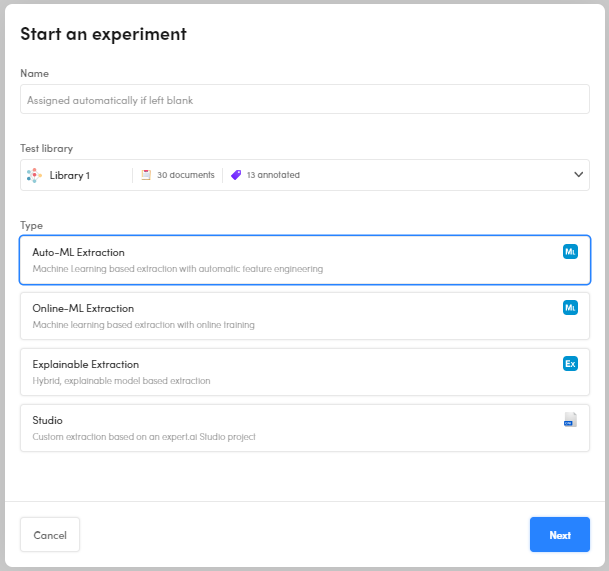
Select Start an experiment
 on the toolbar of the project dashboard.
-
(Optional) Enter a name for the experiment. If you don't, the system will automatically assign a name.
- Select the test library in the Test library drop-down menu, you will be asked to choose the training library in the next step.
- Select the type of experiment.
- Select Next. A wizard corresponding to the type of model will start.
Use the wizard

All the wizards corresponding to the various experiment types are described in the sections below.
The steps of the wizards are used to set all the parameters of the experiment before starting it. In the reference section of this manual you will find the description of all the parameters.
Advanced parameters can be hidden by selecting Hide advanced parameters. When the checkbox is selected, the steps of the wizard that deal exclusively with advanced parameters are skipped.
After completing each step of the wizard, select Next to go on or Back to return to the previous step.
Auto-ML Extraction wizard
Auto-ML extraction experiments can use Platform auto ML feature to automatically choose the text features and the values for hyperparameters to use to train the model.
Unlike online-ML experiments, auto-ML experiments train the model in full-batch mode, passing through the training set all at once and only one time.
These are the steps of the wizard:
-
Training docs
This step determines the training library to use and which documents are taken from the library to train the model.
- Select the training library from the drop-down list.
- Choose the training documents selection policy and check or change subsampling parameters.
- Check or change training windows parameters.
-
Model type
In this step you can select up to three ML model types. A distinct model will be generated for each type you choose.
When you choose multiple model types, all but the summary step of the wizard are skipped and Platform will use default values of the parameters to generate the models and perform the tests.
-
Feature space
This step allows setting the parameters that dictate which text features to use for training.
When Automatic features selection is turned on, Platform automatically determines the text features to use with its auto ML feature. -
Hyperparameters
This step allows setting the hyperparameters of the ML model.
When Activate Auto-ML on every parameter is turned on, Platform automatically determines the values of the hyperparameters with its auto ML feature. -
F-Beta
Use this step to set F-Beta optimization.
-
Auto ML parameters
This step allows setting the parameters of the auto ML feature.
-
Summary
This step allows you to review your choices and select the matching strategy.
You can also turn on Apply the model to the training library to perform a supplemental test of the model against the training library.
Select Start to launch the experiment and watch its progress.
Online-ML Extraction wizard
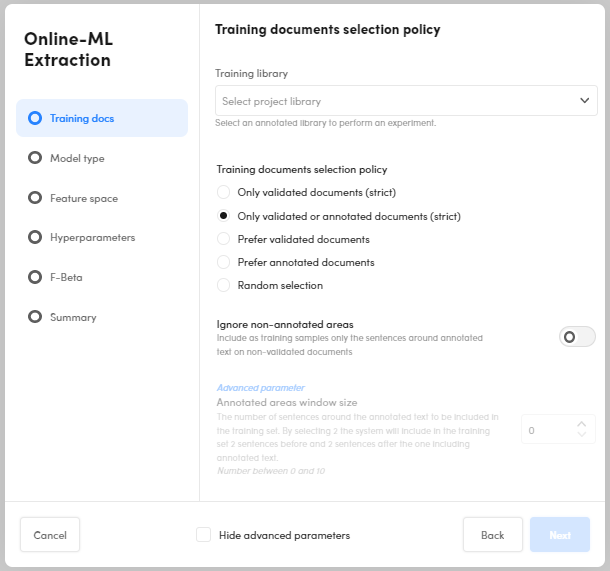
Online-ML extraction experiments use online ML to train the model.
The training set is divided in smaller batches and a model is trained for every batch until the entire training set has been seen, then the process is repeated multiple times (epochs) to find the best model.
The wizard is very similar to the Auto-ML Extraction wizard (see above), the difference is that there are parameters for online ML and auto ML is not available.
Explainable Extraction wizard
Explainable extraction experiments generate models that use human-readable symbolic rules to predict classes.
This type of model can be exported and further managed with Studio as an extraction project.
These are the steps of the wizard:
-
Training docs
This step determines the training library to use and which documents are taken from the library to train the model.
- Select the training library from the drop-down list.
- Choose the training documents selection policy.
-
Rules generation
This step allows setting the parameters that affect symbolic rules generation.
-
Feature options
This step allows setting the feature options.
-
Rules selection
This step allows setting the parameters that affect symbolic rules selection, which is a fine tuning of the rules.
-
Summary
This step allows you to review your choices and select the matching strategy.
You can also turn on Apply the model to the training library to perform a supplemental test of the model against the training library.
Select Start to launch the experiment and watch its progress.
Studio wizard
Studio experiment don't generate models, they analyze the test library using a Studio compatible explainable categorization model (CPK) that was previously imported in the project.
These are the steps of this wizard:
-
Model selection
Select the CPK model from the list.
-
Summary
In this step you can review the features of the model, select the matching strategy and determine how to manage documents with layout information parameter.
Experiment progress
When you complete the wizard, the experiment starts and the progress of the process is displayed.

To terminate the experiment before it ends select Delete experiment.
Information about the outcome of the experiment is displayed in the Info and in the Activity log tabs.
Finally, experiment analytics are displayed in the Statistics panel of Experiments tab. There you can analyze and interpret the results. Experiment results are associated with the test libraries you choose in the experiment wizard, the Experiments tab is disabled for other libraries.
-
Except in Studio experiments, that use an existing model. ↩