Kill lists
Overview
A kill list, like a rule concept list, is a condition related to the text of a document.
If a concept of the taxonomy is marked for extraction and a mention of it is found in a text, it is extracted only if no kill list associated to it is triggered by the same text. A kill list, therefore, can cancel extractions.
Like rule concept lists, a kill list can cover one or more project languages.
Kill lists are managed in the Kill lists tab of the Resources panel which is located in the Resources tab of the project dashboard.
To open the Kill lists tab:
- Select the Resources tab on the main dashboard toolbar.
- If the concept tree is displayed, turn it off by selecting the pencil and ruler icon
 on the toolbar of the Resources panel. The concept tree is replaced by a list of tabs.
 - Select the Kill lists tab in the Resources panel.
Create
To create a new kill list:
- If there are no lists already, select Create kill list in the center of the page.
- If at least one list is already defined, select Create kill list
 on the right of the header of the Kill lists panel.
The Create kill list dialog appears. Enter the name of the list and select Save.
The new list is automatically selected and its details are shown in the right panel.
Define the list
To edit a kill list, select it: its components are displayed on the right panel.
A kill list can consist of a preferred label, an expression or both, for every project language.
The preferred label is interpreted as a literal that must be matched in the text.
The expression is constructed with operands and operators of a special language described in the reference section.
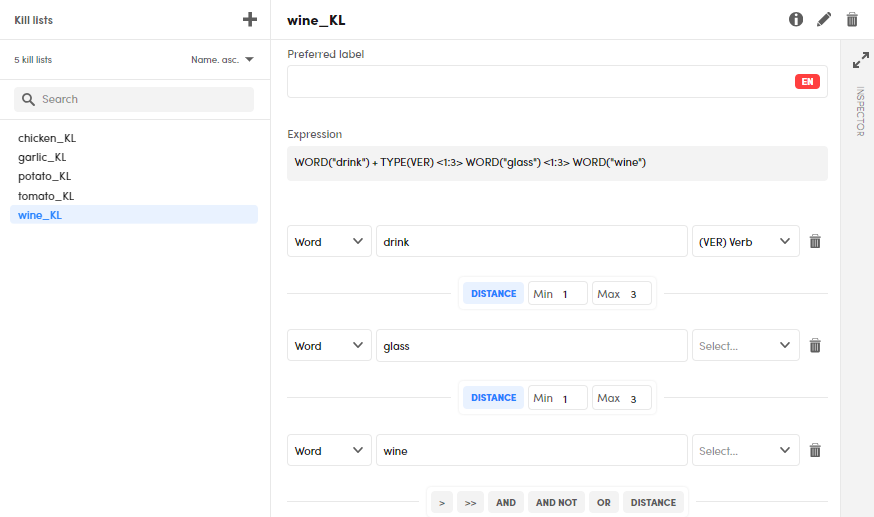
In the definition panel there are composition controls that allow you to build the expression interactively, while the gradually constructed expression is visible in the Expression field.
If both the preferred label and the expression are defined, they are combined with an implicit OR Boolean operator.
To define the kill list portion for a particular language, first select the language tab. In the case of a single project language there are no tabs.
To set an operand, choose its type from the first drop-down list on the left. Depending on your choice, the controls on the right change according to this rule:
| Operand type | Second field | Third field | Fourth field |
|---|---|---|---|
| Pattern | Case sensitivity drop-down | Value | Grammar/entity type drop-down |
| Keyword | Case sensitivity drop-down | Value | Grammar/entity type drop-down |
| Word | Value | Grammar/entity type drop-down | N/A |
| Type | Value (Grammar/entity type drop-down) | N/A | N/A |
In the table above, "Value" is the value of the operand, therefore:
- A regular expression in the case of Pattern
- A literal in the case of Keyword
- A base form (dictionary entry) in the case of Word
- A grammatical or entity type in the case of Type.
After defining an operand, you can choose the operator that links it to any subsequent operand. The operator is chosen from the button panel under the operand and once the choice has been made:
- The button panel is replaced by the chosen operator.
- The visual builder of the new operand appears below the operator.
To go back to the operator choice, select the operator name: the visual builder of the new operand disappears.
Note
The DISTANCE operator has two parameters, Min and Max, which represent the minimum and maximum distance between the text tokens corresponding to the two operands.
The expression is automatically saved after each change.
If at least two operands are defined—or being defined—, to delete one, select the trash bin icon  to the right of the operand fields.
Filter and sort
You can use the controls in the Kill lists panel to filter and sort lists.
To filter kill lists, type something in the search box: only the lists whose name contains what you typed will be shown, the match is case sensitive. Select the X icon  or delete what you have typed to cancel the filter.
To change the sort order, use the drop-down above the list.
Manage target concepts
By selecting and deselecting Show more information  on the toolbar of the right panel, you toggle between the definition of the kill list and the list of concepts to which it is associated, the target concepts.
To add a target concept, that is to associate the kill list with a concept:
- Select Add target concept in the center of the panel or to the right of the Target concepts label: the Add a target concept dialog appears.
- Type at least two characters in the Target concept field. All concepts with a main label that contains what you typed will be listed in the drop-down menu. The match between what you type and the label of the concepts is insensitive cases. Choose the concept from the list.
- Select Add.
To delete a target concept, that is to disassociate the kill list from a concept, select the X icon  on the right of the concept row.
You can also associate and disassociate a kill list with a concept by operating in the Kill lists tab of the Edit concept panel.
Change the name
To change the name of a kill list, select the pencil icon  to the right of the list name. The Edit kill list name dialog appears. Edit the list name and select Save to commit the change.
Inspect
The INSPECTOR panel, on the right edge of the page, contains two tabs:
- Guide: a guide to operators
- Inspector: contextual information about the item selected in the adjacent panel, possibly with navigation shortcuts
To toggle the INSPECTOR panel select the expand  and collapse
  icons at the top of the panel.
The concepts to which a kill list is possibly associated are called target concepts.
To switch between the definition of the kill list and the list of target concepts, select Show inspector on the toolbar of the right panel.
Delete
To delete a kill list, select the trash bin icon on the toolbar of the right panel.